Team:Manchester/Project/Protocols


Medium and Buffers

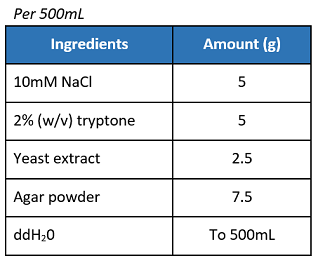
- Prepare the solution by mixing the ingredients stated above.
- Sterilize in an autoclave before using it to prepare the SOC medium.

- Prepare the solution by mixing the ingredients stated above.
- Sterilize in an autoclave.
*Source from 2015 iGEM Exeter
For nucleic acids DNA/RNA separation
- TAE buffer (Tris-acetate-EDTA)
- TBE buffer (Tris-borate-EDTA)
- LAB buffer (Lithium-acetate-borate)

- Prepare the solution by mixing the ingredients stated above.
If not using pre-mixed LB agar powder, prepare the materials as below:
- In a 1L Erlenmeyer flask, swirl and mix the solution.
- Cover the top of the flask with a lid/aluminum foil and label with autoclave tape.
- Autoclave the liquid setting for 20 minutes or according to your autoclave's specifications.
- After removing the solution from the autoclave, allow the agar solution to cool to 55°C in an oven or water bath.
- When pouring the LB agar into plates, keep the bench area sterile by working near a flame or Bunsen burner. Alternatively, prepare the plates in a vacuum hood.
- Add the appropriate amount of desired antibiotic (refer the table below) to the solution and swirl to mix.
- Pour approximately 20mL of LB agar per 10cm polystyrene Petri dish.
- Place the lids on the plates and allow them to cool for until the agar is solidified.
- Label the bottom of plates with antibiotic and date before storing in plastic bags or sealed with Parafilm at 4°C.

Table source from New England Biolabs
Additional note:
- Antibiotic carbenicillin can be substituted for ampicillin in antibiotic selection plates [1].
If not using pre-mixed LB broth powder, prepare the materials as below:

- Prepare the solution by mixing the ingredients stated above.
- Sterilize in an autoclave.

- Prepare the solution by mixing the ingredients stated above.
- Sterilize in an autoclave before using it to prepare SOC medium.
Additional notes
- Some formulations of SOB use 10 mM MgCl2 and 10 mM MgSO4 instead of 20mM MgSO4.
- SOB medium is also available dry pre-mixed from Difco, 0443-17
- Adjust to pH 7.5 prior to use. This requires approximately 25mL of 1M NaOH per liter.
Source from OpenWetWare


- Prepare the solution by mixing the ingredients stated above.
- Filter sterilize using a 0.22 μm filter.
- Store at 4°C or -20°C.
*Source from OpenWetWare: TSS
Transformation
Ingredients:
Before starting the procedure, be sure to:
- Pre-chill centrifuge and cool rotor to 4°C
- Pre-chill 1L of 10% (w/v) glycerol solution on ice
- Pre-chill 500mL/1000mL Falcon tubes on ice
During the procedure:
Work under flame at all times.
- Grow a 5mL overnight culture of cells in LB media.
- In the morning, dilute this culture by at least 1/100 into a 50mL of fresh LB media in a 200mL conical flask.
- Incubate them at 37°C.
- Monitor growth of the cells every 30 minutes by measuring OD at 600nm (OD600) by filling up 750 µL of culture into cuvette. Use LB medium as blank.
- Once the cells are ready at OD600 = 0.4-0.6, harvest the cells to prepare for electroporation.
- Place cultures on ice for 15 minutes.
- Pour each 250mL culture into pre-chilled 500mL (or 1000mL) Falcon tubes.
- Centrifuge at 5000rpm for 10 minutes.
- Pour off the supernatant and aspirate any residual broth.
- Add 250 mL of pre-chilled 10% (w/v) glycerol to each of the centrifuge bottles and completely suspend the cells by pipetting the solution up and down.
- Centrifuge at 5000rpm for 10 minutes.
- Pour off the supernatant.
- Completely suspend the cells in 250mL glycerol and re-centrifuge at 5000rpm for 10 minutes.
- Pour off the supernatant and suspend the cells in the residual glycerol by pipetting up and down.
- At this point you can electroporate or freeze the cells away. To freeze, add 100µL of the culture to microcentrifuge tubes on ice.
- Once you have used all of the culture, transfer the tubes to dry ice for 10 minutes.
- Once the cultures are frozen, transfer them to a -80°C freezer. The cultures should be good for more than 6 months.
All subsequent steps should be carried out at 4°C.
Cells should be kept on ice wherever possible.
Ingredients:
Before starting the procedure, be sure to:
- warm SOC medium to 37°C
- Add 50µL of competent cells + 1 µL of DNA. Mix well and place on ice for 5 minutes.
- Transfer mix to 0.1cm electroporation cuvette (BioRad, #1652083)
- Perform electroporation in a MicroPulse Electroporator (BioRad) using one pulse of 1.80 kV (EC1).
- Measure the time constant (~5ms).
- Add 950µL of pre-warmed SOC medium (37°C) to the cuvette immediately after electroporation.
- Transfer to a fresh sterile 2mL tubes.
- Incubate at 37°C for 2 hours.
- Plate 50, 100, 200 µL (appropriate dilutions) and the rest of the cells (by centrifuging for 1 sec then decanting the liquid and resuspending with what is left in the tube) into LB agar plates using a plastic spreader.
- Incubate at 37°C overnight (approximately 16-18 hours).
- Look for transformants the next morning.
- Take note of the dilutions made to use for colony calculations next day.
*Source from New England Biolabs
Ingredients:
Before starting the procedure, be sure to:
- Pre-chill 1mL Eppendorf tubes
- Pre-chill TSS buffer
- Pre-chill Falcon tubes
During the procedure:
Work under flame at all times.
- Grow a 5mL overnight culture of cells in LB media.
- In the morning, dilute this culture by at least 1/100 into a 50mL of fresh LB media in a 200mL conical flask.
- Incubate them at 37°C.
- Monitor growth of the cells every 30 minutes by measuring OD at 600nm (OD600) by filling up 750 µL of culture into cuvette. Use LB medium as blank.
- Once the cells are ready at OD600 = 0.2-0.5, harvest the cells to prepare for chemical transformation.
- Split the culture into 50mL Falcon tubes and incubate on ice for 10 minutes.
- Centrifuge for 10 minutes at 3000 rpm and 4°C.
- Remove the supernatant. Pipette out any remaining media.
- Re-suspend in pre-chilled TSS buffer. The volume of TSS to use is 10% of the culture volume (i.e 25mL culture = 2.5mL of TSS to be added) that you spun down.
- Add 100µL aliquots to your chilled 1mL Eppendorf tubes and store at -80°C.
All subsequent steps should be carried out at 4°C.
Cells should be kept on ice wherever possible.
You may need to vortex gently to fully re-suspend the culture, keep an eye out for small cell aggregates even after the pellet is completely off the wall.
*Source from OpenWetWare
Ingredients:
Before starting the procedure, be sure to:
- Thaw competent cells from -80°C on ice
During the procedure:
Work under flame at all times.
- Add 50µL of competent cells + 1 µL of DNA (2.5µL of DNA if doing ligation).
- Mix well and place on ice for 30 minutes, or 5-10 minutes if in a rush.
- Heat shock the cells at 42°C for 30 seconds.
- Incubate on ice for 2 minutes.
- Add 450µL of SOC medium (kept in 4°C fridge) to the cells.
- Incubate for 45 minutes at 37°C in the shaker (30 minutes for Carbenicillin).
- Plate 50, 100, 200µL (appropriate dilutions) and the rest of the cells (by centrifuging for 1 second then decanting the liquid and resuspending with what is left in the tube) into antibiotic containing LB agar plates using a plastic spreader.
- Incubate at 37°C overnight (approximately 16-18 hours).
- Look for transformants the next morning.
*Source from OpenWetWare
Preparing overnight cultures
During the procedure:
Work under flame at all times.
- Prepare an overnight culture by inoculating one isolated single colony into 10mL of LB medium containing its respective antibiotic in a 50mL Falcon tube.
- Incubate in a shaker overnight at 37°C.
Bacterial glycerol stock
Ingredients
- 50% sterile glycerol
- Cryogenic vials
- Add 400µL of 50% glycerol to a cryogenic vial.
- Add 600µL of culture sample to be stored.
- Gently vortex the cryogenic vial to ensure the culture and glycerol is well-mixed. Alternatively, pipet to mix.
- On the side of the vial list all relevant information, including: Part, vector, strain, date, researcher etc.
- Store in a freezer box in a -80°C freezer.
Additional note:
- While it is possible to make a long term stock from cells in stationary phase, ideally your culture should be in logarithmic growth phase.
*Source from OpenWetWare
MINIPREP
Ingredients:
- Buffer P1
- Buffer P2
- Buffer N3
- Buffer PB
- Buffer PE
- Milli-Q water
Before starting the procedure, check if:
- Ethanol has been added to the PE and P1 buffer
- If added, there will be a tick on the lid.
- If not, add according to instructions labelled on the bottle.
- Spin down the overnight cultures at 10000 rpm at 4°C for 10 minutes using the communal centrifuge or 20mins at 4000rpm.
- Discard the supernatant. Bacteria will be pelleted at the bottom of the 50mL Falcon tube.
- Resuspend the pelleted bacteria with 250µL of Buffer P1 (always on ice).
- Transfer the re-suspended bacteria to a fresh 2mL Eppendorf tube.
- Add 250µL of Buffer P2 to the tube with bacteria and mix gently. Your sample should turn blue.
- Incubate for 5 minutes at room temperature
- Add 350µL of Buffer N3 and mix gently. Your sample should be colourless and should contain a white precipitant.
- Centrifuge samples at 14000 rpm for 10 minutes using a tabletop centrifuge.
- Transfer 750µL of the supernatant to a QIAprep Spin column (blue column).
- Centrifuge at 11000 rpm for 1 minute using a tabletop centrifuge.
- Pour the flow through again onto the column to increase the DNA concentration but do not close the cap tightly.
- Spin it down quickly for 3 seconds using the table top centrifuge/let it sit for at least 10 minutes. Discard the flow through.
- Add 500µL Buffer PB to the column.
- Centrifuge at 13000 rpm for 30 seconds using a tabletop centrifuge.
- Discard the flow through. Add 750µL Buffer PE to the column.
- Incubate at room temperature for 5 minutes.
- Centrifuge at 13000 rpm for 1 minute. Discard supernatant.
- Centrifuge at 13000 rpm for 1 minute.
- Transfer column to a fresh 1.5 mL Eppendorf tube.
- Add 30µL of Milli-Q water (use lesser amount if concentration before miniprep is low)
- Incubate for 5 minutes at room temperature.
- Centrifuge at 11000 rpm for 1 minute.
- Check concentration of DNA using Nanodrop.
(IMPORTANT: Do not allow more than 5 min incubation as this would degrade your plasmid)
*Source from Qiagen
Nanodrop DNA concentration measurement
Ingredient
- Milli-Q water
- Load 1µL of Milli-Q water to the Nanodrop and blank.
- Clean and load another 1 µL of Milli-Q water to the Nanodrop.
- Measure and proceed only if the Nanodrop is clean. When it is clean, the absorbance should be near zero at all measured wavelengths.
*Source from Thermo Scientific
Restriction enzyme digest

- Volume of DNA to be added varies depending on the concentration of DNA stock. Add water to make up to 50µL. (Use 1µL for any enzyme)
- Incubate for 1 hour (1 hour for XbaI; 1 1/2 hours for PstI) in a 37°C water bath or using the PCR reaction machine.
- Heat inactivate the restriction enzymes at 65°C for 20 mins using the PCR machine.
- Heat inactivated products can be temporarily stored on ice (or 4°C) until used, or different temperature depending on storage period.
- Cast a 1% gel and run the samples for approximately 45 minutes, 100V.
*Source from New England Biolabs
Agarose gel
Tips and tricks for good gel electrophoresis results
- Always have your gloves on and dispose ethidium bromide/SYBR Safe contaminated consumables accordingly - Safety first!
- Choose the right gel buffer
- Choose the right type of agarose (depending on desired gel strength, gel melting temperature and electroendosmosis)
- Choose the right % of agarose
- Ensure that the thickness of agarose gel does not exceed 5mm (recommended thickness = 3-4mm)
- Ensure that sufficient DNA sample is added (3-100ng)
- Choose the running voltage and time for agarose gel electrophoresis
- Ensure that the DNA samples run in the right direction (-ve black end to +ve red end)

Amount of agarose to use depends on the DNA fragment size that you are expecting.

*Source from New England Biolabs

- Dissolve agarose with the desired gel buffer in a conical flask. Warm in the microwave for 1 min at maximum power. Avoid bubble formation.
- Swirl gently to cool it down.
- Once cool, add SYBR Safe.
- Prepare a casting tray with suitable comb depending on purposes and number of samples (wide for gel extraction or narrow for restriction digest).
- Pour the mixture into the casting tray with a comb.
- Wait for approximately 10 to 15 minutes until it solidifies.
Ingredients
- Loading dye
- 2-log ladder/low MW ladder
- Agarose gel
- TAE/LAB buffer
- Ethidium bromide (optional)
Before starting the procedure, be sure to:
- Thaw purple loading dye from -20°C
- Thaw 2-log ladder/low MW ladder from -20°C
- Prepare the sample mix by adding 5µL sample + 1µL 10X concentrated dye solution.
- Load 6µl (all of the sample) into a well and 6µl of ladder
- Run the gel at 100V for approximately 45 minutes. Ensure that the gel is run from –ve (black) to +ve (red) end.
- Fill the box with the same buffer used to dissolve the agarose powder.
- Visualize an agarose gel containing DNA using a transilluminator.
- While in the UV room:
- Ensure that the door is locked.
- Always wear gloves.
- Adjust the sharpness and brightness to get a distinct image of the bands.
- Save images using the pen drive without using gloves to prevent ethidium bromide/SYBR Safe contamination.
- If the bands appear to be faint, soak the gel in ethidium bromide for approximately 30 minutes.
- Re-visualize gel.
2-log ladder for 0.1-10kb samples; low MW ladder for 25-766bp samples
Molecular weight standards


DNA purification
For purification of up to 10 μg PCR product, 100 bp to 10 kb
Ingredients:
- Buffer PB (with pH indicator dye added)
- Buffer PE
- Milli-Q water
- Add 5 volumes of Buffer PB to 1 volume of PCR reaction.
- Add 10 µL of 3M sodium acetate (pH 5) and mix. Solution will turn yellow.
- Transfer to a QIAquick Spin column (purple column) and centrifuge at 11000 rpm for 1 minute.
- Discard flow through and keep column in the same tube.
- Add 750µL of Buffer PE.
- Incubate for 5 minutes.
- Centrifuge at 13000 rpm for 30-60 seconds. Discard the flow through.
- Centrifuge and spin again at 13000 rpm for 2 minutes.
- Transfer the column to a fresh 1.5mL Eppendorf tube and add 30µL of Milli-Q water.
- Incubate for 5 minutes.
- Centrifuge at 11000 rpm for 1 minute.
- Measure concentration using Nanodrop.
*Source from Qiagen
For gel extraction/cleanup of up to 10μg PCR product, 70 bp to 10 kb
Ingredients:
- Buffer QG
- Buffer PE
- 3M Sodium acetate
- Isopropanol (IPA)
- Milli-Q water
- Cast a 1% TAE agarose gel with wide comb.
- Add 10µL of 6x dye solution to the 50µL sample. Load all samples into one comb and the DNA ladder next to it and run for about 45 minutes at 100 V (or 120 V for 40 minutes).
- Weigh the empty 2mL Eppendorf tube.
- Cut the band corresponding to the DNA fragment and transfer to the weighed tube.
- Weigh it again and calculate the weight of your gel fragment.
- Add 3X of the weight of the cut band of Buffer QG.
- Incubate at 50°C for 10 minutes in a water bath or until the gel dissolves.
- Add 10µL of 3M sodium acetate before adding 1X volume of IPA.
- Mix and transfer to a QIAquick Spin column (purple column).
- Incubate for 2 minutes.
- Centrifuge at 10000 rpm for 1 minute using a tabletop centrifuge. Discard the flow through.
- Add 500 µL Buffer QG to the column and centrifuge at 10000 rpm for 30 seconds using a tabletop centrifuge. Discard the flow through.
- Add 750µL Buffer PE to the column.
- Incubate at room temperature for 5 minutes.
- Repeat steps 14 - 15.
- Centrifuge at 10000 rpm for 30 seconds. Discard the flow through.
- Centrifuge at 10000 rpm for 2 minutes.
- Transfer column to a fresh 1.5 mL Eppendorf tube.
- Add 15µL of Milli-Q water.
- Incubate for 5 minutes at room temperature.
- Centrifuge at 10000 rpm for 1 minute.
- Check concentration using Nanodrop.
Source from Qiagen
Ligation
- Set up the following reaction in a microcentrifuge tube on ice.
- Determine the suitable molar ratio according to your insert:vector fragment size.
- Gently mix the reaction by pipetting up and down and microfuge briefly.
- Incubation period differs, hypothetically overnight incubation gives the best result
- For sticky ends, incubate at 4°C overnight or room temperature for 20 minutes.
- For blunt ends or single base overhangs, incubate at 4°C overnight or room temperature for 2 hours. Alternatively, high concentration T4 DNA Ligase can be used in a 20 minute ligation.
- Heat inactivate at 65°C for 10 minutes.
- Chill on ice and transform 1-5 μL of the reaction into 50 μL competent cells.

*Source from New England Biolabs
- Prepare the following in a PCR tube:
- Mix thoroughly before adding the following:
- Mix thoroughly and incubate for 5 minutes at room temperature (or 20-30 minutes on ice).
- The ligation reaction mixture can be used directly for the transformation or can be stored at -15°C to -25°C for later transformation.
- For transformation, use no more than 1/10 of the ligation reaction mixture with the competent cells. Additional notes:
- Heat inactivation of the T4 DNA ligase drastically decreases the transformation efficiency.
- Do not use more than 1/10 of the volume of the ligation reaction mixture for the transformation assay.
- The ligated DNA can be analyzed by agarose gel electrophoresis.


*Source from Roche
PCR
- Prepare a colony PCR master mix as below :
- Transfer 24 µL from the master mix to a fresh PCR tube.
- Pick one colony using a toothpick for one PCR tube. Avoid mixing different colonies into one tube.
- Resuspend the single colony in 10 µL of sterile water by placing the toothpick into the buffer and mix it well.
- Use 1µL of the re-suspended colony as template for the colony PCR.
- Make a small patch using the remaining 9µL to a single plate containing antibiotic.
- Repeat steps 1-6 using different colonies and plate all of them to make a master plate.
- Incubate the plate containing samples at 37°C.
- Run the colony PCR in the thermocycler with the program below:
- Once PCR is complete, run on a 1% gel to visualize the amplified band size.


Use of New England Biolabs’ Tm Calculator ] is highly recommended.
*Source from New England Biolabs
- PCR reaction was done using Q5 polymerase. The reaction was set up as follows:
- Once PCR is complete, run on a 1% gel to visualize the amplified band size.


Use of New England Biolabs’ Tm Calculator ] is highly recommended.