Description
Protein purification is important to both biopharmaceutical production and scientific research. Producing recombinant proteins with high purity is essential for protein drug-based therapies, protein structural analyses and functional studies. Most currently used protein purification techniques, such as commercial resins conjugated by various ligands, different types of chromatography and ultracentrifugation, require expensive investment, special device or tedious procedure. Meanwhile, they have different flaws in getting purified proteins, such as low specificity, long-term operating procedures and harsh conditions to sacrifice protein activity; thus, many of them, even with their combinations, cannot meet the required protein purity and quality for many applications. For instance, affinity chromatography is reputed for its high affinity, but tightly bound proteins typically require relatively extreme eluting conditions to disassociate from affinity columns; ultracentrifugation or size exclusion separates samples based on molecular weight difference, but they can co-purify other proteins and large molecules of lipid or nuclear acids. Thus, developing fast, easy to operate and economic approaches to purify recombinant proteins with high quality is urgently needed.
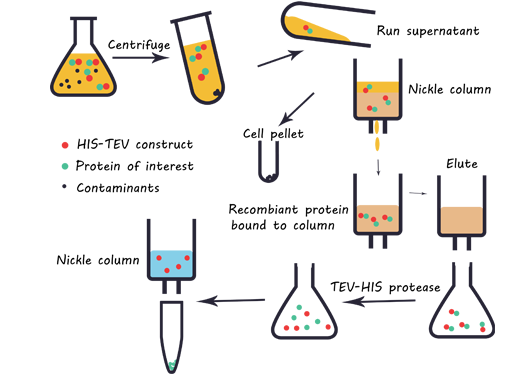
Fig.1 Purification progress by using the Nickel column
Our team developed a novel protein purification approach that eliminates most weaknesses of other techniques. Our method is based on the highly specific recognition and covalent conjugation between Spytag (a peptide with 13 amino acids) and Spycatcher (a peptide with 116 amino acids). We also take the advantage of a magnetic bacterium AMB-1 that can produce magnet particles, also called Magnetosome, covered by a bilayer phospholipid membrane, in which Mms13 protein is anchored. We generate Spycatcher-Mms13 and express this fusion protein in AMB-1 bacteria to make Spycatcher linked to the Magnetosome. A protein of interest with a Spytag at its N- or C-terminus is expressed in E. coli and present in bacterial lysate. The Spycatcher-Mms13-linked Magnetosome can specifically and covalently conjugate to the Spytag-tagged protein in the bacterial lysate and they can be simply co-purified by a magnet. Due to covalent linkage, stringent washing can be used to achieve high purity of the recombinant protein that is subsequently released by cleavage of a designated protease.
Overall, our novel approach for protein purification is reliable and highly specific. It provides a better solution to reach high protein purity and quality by remedying many drawbacks of currently used methods.
Design
Magnetic bacteria Magnetospirillum magneticum strain AMB-1 is a gram-negative, facultative anaerobic bacterium. It produces a unique organelle known as Magnetosome using iron and other metal ions. Magnetosome consists of uniform nano-sized magnetic particles (50 to 100 nm) arranged as chains in cytoplasm and embraced by a stable lipid bilayer membrane, and exhibits strong ferrimagnetism.

Fig.2 Transmission electron microscope image of (A) AMB-1 and (B) Magnetosome
Magnetosome has been used in various biomedical applications because it is easy to handle and can be used to separate target molecules from reaction mixes. Several proteins are identified to tightly bind to the membrane of Magnetosome, such as MagA, Mms16, and Mms13. Among them, Mms13 has the highest affinity to the magnetic core, and its anchoring efficiency is also better than other Mms proteins. Thus, a protein of interest can be expressed on the Magnetosome when fused with Mms13. The magnetic particles can be easily extracted and purified from bacterial lysate of AMB-1 transformant using a magnet.

Fig.3 Proteins on the Magnetosome’s membrane and AMB-1 modification by transformed with Mms13 protein.
Choosing an appropriate tag is crucial for detecting and purifying a recombinant protein. However, the interaction of tags with corresponding ligands is typically reversible and mostly has low affinity. Streptococcus pyogenes fibro-nectin-binding protein FbaB contains a domain with a spontaneous isopeptide bond between Lys31 and Asp117. This domain can be splitted into two fragments: the small one (13 amino acids) is named as Spytag, while the big one (116 amino acids) is Spycatcher. When they meet together, the two parts can specifically associate and spontaneously form an isopeptide bond. The reaction can take place in diverse conditions, even in relatively extreme pH and temperatures.

Fig.4 Highly specific recognition and covalent conjugation with Spychatcher and Spytag.
We used this feature of Spytag and Spycatcher to design a handy tool for protein purification. In the magnetic bacterium AMB-1, Spycatcher-Mms13 fusion protein is expressed and the Mms13 part can tightly associate with the Magnetosome. As a result, the Spycatcher in the fusion protein is anchored in the Magnetosome, which can be isolated from AMB-1 bacterial through sonication and centrifugation. Due to fast growing and easy genetic engineering of E. coli we utilize it to produce recombinant proteins of interest with a Spytag at either the N- or C- terminus. To easily release a captured recombinant protein, we add a cleaving site for the tobacco etch virus (TEV) protease between the protein of interest and Spytag. Now the isolated magnetosome linked by Spycatcher can be used to specifically bind to the Spytag tagged recombinant protein in bacterial lysate of E. coli. After Spytag and Spycatcher form an irreversible covalent bond via spontaneous isopeptide linkage, they can be brought down together with the Magnetosome in a magnetic field. Extensive and stringent washing can be applied to remove proteins of nonspecific binding and the protein of interest can be released by cleavage of TEV protease.

Fig.5 Steps to purify protein in a new way
One caveat in the design above is that the TEV protease is still present in the final elution of the recombinant protein. The following two strategies can be used to circumvent this problem.
First, in the design shown above, we can express a TEV protease-Mms13 fusion protein in AMB-1; thus, the TEV protease can be easily removed after it fulfills its task. Second, we can use a self-cleavable sequence, intein, to replace the TEV site. In this case, the recombinant protein can be released by DTT(DL-Dithiothreitol)-mediated cleavage.
Experiment&Protocol
| AMB-1 | E. coli | ||
| Incubation | Wet-lab | Prokaryotic Expression | Protein Purification |
| Strain Medium Bacteria recovery Bacteria incubation Collect cells Ultracentrifugation Magnetosomes extraction Exam the purified Magnetosome Storage and sterilization of purified Magnetosome |
Electrocompetent cells Transformation by Elecroporation Transformants incubation |
Medium PCR Gel extraction PCR purification Restriction diges Agarose gel Electrophoresis Ligation Transformation Colony PCR Identification Sequence |
GST protein Expression and purification MagneGST protein purification Bradford protein assay SDS-PAGE |
Strain
The Magnetospirillum magneticum strain AMB-1(ATCC 700264) was purchased from ATCC and keep in -80℃.
Medium
For the enrichment of the AMB-1 strain, we use the medium contained the following ingredients:
Magnetic Spirillum Growth Medium (1 L)
(pH=6.7±0.1)
| Component | Mass |
| Distilled water | 1 l |
| Wolfe's Vitamin Solution | 10 ml |
| Wolfe's Mineral Solution | 5 ml |
| Ferric Quinate | 5 ml |
| KH2PO4 | 0.68 g |
| NaNO3 | 0.12 g |
| Tartaric acid | 0.37 g |
| Succinic acid | 0.37 g |
| Sodium acetate | 0.05 g |
| 0.1% Resazurin | 0.45 ml |
| Ascorbic acid | 0.035 g |
Autoclave medium at 121℃ for 15 minutes.
Wolfe's Vitamin Solution
| Component | Mass |
| Biotin | 2 mg |
| Folic acid | 2 mg |
| Pyridoxine hydrochloride | 10 mg |
| Thiamine . HCl | 5 mg |
| Riboflavin | 5 mg |
| Nicotinic acid | 5 mg |
| Calcium D-(+)-pantothenate | 5 mg |
| Vitamin B12 | 0.1 g |
| p-Aminobenzoic acid | 5 mg |
| Thioctic acid | 5 mg |
| Distilled water | 1 l |
Filtered through 0.22 μl filter
Wolfe's Mineral Solution
| Component | Mass |
| Nitrilotriacetic acid | 1.5 g |
| MgSO4·7H2O | 3 g |
| MnSO4·H2O | 0.5 g |
| NaCl | 1 g |
| FeSO4·7H2O | 0.1 g |
| CoCl2·6H2O | 0.1 g |
| CaCl2 | 0.1 g |
| ZnSO4·7H2O | 0.1 g |
| CuSO4·5H2O | 0.01 g |
| AlK(SO4)2·12H2O | 0.01 g |
| H3BO3 | 0.01 g |
| Na2MoO4·2H2O | 0.01 g |
| Distilled water | 1 l |
Autoclave medium at 121℃ for 15 minutes.
Bacteria recovery
1.Keep?vial?frozen?until?ready?to?use,?then?thaw.?Thaw?contents?of?the?vial?in?a?37 ℃?water?bath?with gentle?agitation.
2.Inoculate?a?single?tube?of?MSGM?with?the?entire?contents?of?the?thawed?vial.?Be?sure?the?entiretube?is?filled?with?medium?to?achieve?microaerophilic?conditions.
3.Incubate?at?30 °C?for 7 days.
4.When?broth?becomes?cloudy?and?a?small?gray?sediment?is?visible?at?the?bottom?of?the?tube,?cells?can be?harvested.?Divide?contents?of? the?tube?into?two?tubes?and?spin?in?a?tabletop?centrifuge.
5.Discard?the?supernatant?liquid.?Do?not?bubble?or?shake?cells.?Resuspend?cells?in?a?125?mL?flask.
6.Incubate?as?directed?above.
Bacteria incubation
1. Add 1 ml AMB-1 bacterium solution into a 100 ml serum bottle supplemented with 75 ml MSGM.
2. Incubate at 30℃ under microaerophilic conditions.
Cells collection
1. Make sure bacterium solution in the logarithmic growth phase.
2. Transform it into 50 ml tubes, centrifugation at 8000 r for 5 min.
3. Discard the supernatant, wash the cells with 1 ml PBS, centrifugation at 8000 r for 5 min.
4. Repeat step 3.
5. Resuspend with 1 ml sterile water.
Ultracentrifugation
1. Harvest cells by centrifugation at 10,000 ×g and washed twice with 100 mM phosphate buffer (pH 7.0).
2. Resuspend cells in 100 ml of the same buffer.
3. Disrupt the cells by sonication at 4℃ for 5 s.
4. Remove cell debris and unbroken cells by centrifugation for 20 min at 10,000×g at 4 ℃.
5. The supernatant was used as the crude enzyme.
Magnetosomes extraction
1. AMB-1 strain is concentrated by centrifugation at 10,000g for 20 min at 4℃.
2. Put AMB-1 suspended in 10 ml of phosphate buffer saline (PBS; pH 7.4), disrupted by low level ultrasonication.
3. Use the optical microscope to examine the effect of disruption.
4. Collect Magnetosomes from the bottom of a tube by multifunctional magnetic corpuscle separator which can produce an inhomogeneous magnetic field (see device).
5. Remove the supernatant.
6. Wash Magnetosomes eight to ten times with PBS while agitating via low level ultrasonication.
Exam the purified Magnetosomes
The purified Magnetosomes was suspended in 20 μl PBS and put onto 300-mesh carbon-coated copper grids. Samples were observed through TEM(Transmission electron microscopy) at an accelerating voltage of 300 kV.
Storage and sterilization of purified Magnetosomes
The purified Magnetosomes were lyophilized using a freeze drier for 20 h. The lyophilized Magnetosomes were stored at -20℃ for further assay.
Electrocompetent cells (AMB-1)
1. Put 200 ml bacterium solution (in the logarithmic growth phase) into a falcon tube, ice bath for 10 min.
2. Centrifugation (8000 rpm, 30 min) at 4℃, discard supernatant.
3. Resuspend with 10 mM TES (pH 7.5), wash cells twice with 1 ml sterile water.
4. Centrifugation (3000 rpm, 12 min)
5. All the bacterium suspend in 2 ml TES, divide the bacterium solution into two 1.5 ml falcon tubes, keep in -40℃.
Transformation by elecroporation
1. Mix 40 μl electrocompetent cells with 2 μl plasmid DNA.
2. Carefully?transfer?the?cell?mix?into?a?chilled?cuvette?without?introducing?bubbles?and?make?sure?that?the cells?deposit across?the?bottom?of?the?cuvette.
3. Electroporate?using?the?following?conditions?for?BTX?ECM?630?and?Bio-Rad?GenePulser?electroporators:?2 kV,?200 Ω,?25 μF? electric?pulse?in?a?0.2?cm?cuvette.
4. Immediately?add?500μl MSGM medium to the?cuvette, harvest the cells by shake cultivation (100 rpm) at 27℃ for one night.
5. Dilute the cells as appropriate then spread 250 μl cells onto a pre-warmed MSGM plate.
6. Incubate the plates at 30℃ for 1 to 2 days under anarobic condition.
7. Use isolated colonies to check the correct insertion.
Transformants incubation
The transformants were cultured in MSGM containing 50 μg/ ml ampicillin.
Medium
For the enrichment of the E. coli strain, we use the medium containing the following ingredients:
LB medium (500 ml)
| Component | Mass |
| Tryptone | 5 g |
| MgSO4·7H2O | 3 g |
| Yeast Extract | 2.5 g |
| NaCl | 5 g |
| Distilled water | 500 ml |
PCR
1. Set up a small box with ice, put DNA and polymerase mix into it before going into the Bio-rad S1000TM thermocycler cycler.
2. Add the following reagent to a PCR tube.(50 μl).
| 2× Taq Master Mix (Enzyme) | 25 μl |
| Template (5ng/ μl) | 1 μl |
| Forward Primer (10 μM) | 1 μl |
| Reverse Primer (10 μM) | 1 μl |
| ddH2O | 22 μl |
3. Program the thermocycler as follows:
Temperature: Time
| 94℃ | 5 min |
| 94℃ | 30 s |
| 58℃ | 30 s |
| 72℃ | (60 s)× (1 kb) |
| 72℃ | 10 min |
| 4℃ | forever |
Gel Extraction
For the Gel Extraction we used TIANprep Midi Plasmid Kit according to manufacturer’s instruction
PCR Purification
1. Add 5 volumes of Buffer PB to 1 volume of the PCR sample and mix.
2. If pH indicator has been added to Buffer PB, check that the color of the mixture is yellow.
3. Place a QIAquick spin column in a provided 2 ml collection tube.
4. To bind DNA, apply the sample to the QIAquick column and centrifuge for 30–60 s.
5. Discard flow-through. Place the QIAquick column back into the same tube.
6. To wash, add 0.75 ml Buffer PE to the QIAquick column and centrifuge for 30–60 s.
7. Discard flow-through and place the QIAquick column back in the same tube.
8. Centrifuge the column for an additional 1 min.
9. Place QIAquick column in a clean 1.5 ml microcentrifuge tube.
10. To elute DNA, add 50 μl Buffer EB (10 mM Tris·Cl, pH 8.5) or water (pH 7.0–8.5) to the center of the QIAquick membrane andcentrifuge the column for 1 min.
Restriction Digest
1. Add the following reagents to a tube (Total: 30 μl).
| DNA | 500-1000 ng |
| Enzyme (NEB) | 1 μl |
| 10×Buffer | 3 μl |
Fill the rest with water.
2. Pipette up and down thoroughly.
3. Put at 37℃ for about 4 hours (according to different enzymes).
Agarose Gel Electrophoresis (0.7%)
1. Weigh 0.21 g of agarose.
2. Add 30 ml of TAE 1X.
3. Heat up until the solution is homogeneous.
4. Add 1 μl Gelred into solution and mix well.
5. Put the solution into bed for polymerize, make sure "comb" is well placed and the solution is balanced.
6. 20 min later, use the gel.
Ligation (Total: 15μl)
| Vector | Varied from different desired combinations of insert and backbone |
| Insert fragment | |
| T4 ligase(NEB) | 0.5 μl |
| 10×Ligation Buffer | 1.5 μl |
Include negative control reaction which contains no insert DNA.
Fill the rest with water, put at room temperature for 4 hours.
Transformation:
1. Put Trans1-T1 Phage Resistant Chemically Competent Cells on ice for melting.
2. Add 50 μl electrocompetent cells into tubes, mix with 5μl ligation product thoroughly, incubate the cells on ice for 30 min.
3. Heat shock the cells for exactly 30 s at 42 ℃ water bath.
4. Place back on ice for 2 min.
5. Add 250 μl of SOC (37℃ to RT) medium to each tube, shake the tubes at 37 ℃, 220 rpm for 60 min.
6. Discard 200 μl supernatant, peptide up and down, resuspend the sediment.
7. Plate 100 μl for a reaction product, incubate plates upside down overnight at 37℃.
Colony PCR (Total: 20 μl)
1. Pick colonies as the template for colony PCR. The number picked for each plate depends on the difference between the positive and negative controls.
| 2×Taq Master Mix (Vazyme) | 10 μl |
| Template | colony |
| Forward Primer (100 μM) | 0.05 μl |
| Reverse Primer (100 μM) | 0.05 μl |
Fill the rest with water.
2. Test digest performed and products analysed using agarose gel electrophoresis to confirm if correct construct was present.
3. Use colony PCR to enlarge colony numbers. Then only the positive clones were mini-prepped.
Mini-prep
For the plasmid extraction we used PurePlasmid Mini kit according to manufacturer's instructions.
Identification (Total: 10 μl)
| DNA | 500-1000 ng |
| Enzyme (NEB) | 1 μl |
| 10×Buffer | 1 μl |
Fill the rest with water.
2. Pipette up and down thoroughly.
3. Put at 37℃ for about 4 h (according to different enzymes)
Sequence
Positive clones were sent for sequencing of the insert using appropriate primers.
GST protein expression and purification
Expression:
1. Inoculate the bacteria and let them grow overnight at 37℃.
2. On the second day, use LB medium dilute the bacteria by about 1/50 and let them grow at 37℃ for 2-3 h until the A600nm reaches 0.6-0.8.
3. Add IPTG till final concentration of 0.1 mM to 2.0 mM and continue growing for another 3-4 h. Alternatively, the bacteria can also grown at room temperature.
4. Temperature overnight after adding IPTG. (Lower temperature and lower IPTG concentration could reduce the formation of inclusion bodies and consequently increase the solubility of the synthesized protein).
5. The bacteria with centrifugation 3.000 g×10 min at 4℃. Wash the pelleted bacteria by PBS and centrifugate in the same way. The bacteria pellet can be stored at -80℃.
6. Resuspend the pellet in Bacteria Lysis Buffer or STE buffer.
7. Add lysozyme till final concentration of 1 mg/ml and leave the bacteria on ice forat least 15 min. Just before the sonication, add 100 μl of 1 M DTT and 1.4 ml of 10% Sarkosyl. Mix thoroughly and sonicate for 1 min.
8. Centrifuge at 16,000 rpm for 20 min to pellet the debris on the SS34 rotor.
9. The supernatant can be stored at -80℃ freezer.
Purification:
1. The Glutathione-Agarose beads should be hydrolyted for at least 2 h by PBS or water. Then use 1% non-fat milk to block the bead for at least 30 min.
2. Wash the bead by PBS for 4-5 times to remove the milk. Add NaN3 to prevent the bacteria from growing.
3. To pull down the GST protein, add 20 μl of the blocked bead to each sample in eppendorf tubes.
4. Rotate the tubes at 4℃ for at least 15 min.
5. Spin the tubes at 6,500 rpm for 10-20 s.
6. Aspirate the supernatant and wash with 1 ml of PBS.
7. Repeat the step 6 for 6-9 times.
8. Use the Elution Buffer to elute the bound GST protein.
MagneGST Protein Purification
Preparation of Cells:
Bacterial cultures can be grown in tubes or flasks. Grow the culture containing the appropriate GST-fusion protein (GST-spycatcher) to an O.D.600 between 0.4 and 0.6, then induce protein expression. For IPTG induction, add IPTG till final concentration of 0.4mM-1mM and incubate at 37℃ for 3 h or at 16℃ overnight. Depending upon the expression system, other methods of induction and growth conditions can be used. Induction conditions often require optimization. For 1ml bacterial cultures, pellet cells by centrifugation at 16,000 g for 3 min and carefully remove the supernatant. For culture volumes larger than 1 ml, pellet the cells by centrifugation at 3,000 g for 20 min. Carefully remove the supernatant. The cell pellet can be frozen at –20℃ or–70℃ for long-term storage, or the cells can be lysed immediately.
Cell Lysis:
1. Prepare cell pellets from bacterial culture. Remove all growth medium. Recommended: Freeze the cell pellets at –20℃ (15–20 min is usually sufficient) or on dry ice for 5–10 min. Freezing cell pellets will increase efficiency of cell lysis of certain strains, such as the BL21 series of strains, or when cultures are grown to a high density. For cultures of O.D.600 >2, more lysis buffer will be required.
2.Resuspend the pellet in MagneGST Cell Lysis Reagent at room temperature (20–25℃) by pipetting or gentle mixing. (for 500 ml of bacteria culture, use 10 ml of MagneGST Cell Lysis Reagent)
3.Incubate the cell suspension at room temperature for 20–30 min on a rotating platform or shaker and then sonicate for 1 min.
Particle Equilibration:
1. Thoroughly resuspend the MagneGST particles by inverting the bottle to obtain a uniform suspension.
2. Pipet 100 μl of MagneGST particles into a 1.5 ml tube.
3. Place the tube in the magnetic stand, and allow the MagneGST particles to be captured by the magnet.
4. Carefully remove and discard the supernatant.
5. Remove the tube from the magnetic stand. Add 250 μl of MagneGST Binding/Wash Buffer to the particles, and resuspend by pipetting or inverting.
6. Repeat Particle Equilibration Steps 3–5 times.
Binding:
1. After the final wash, gently resuspend the particles in 100 μl of MagneGST Binding/Wash Buffer. Note: After being washed and resuspended in the appropriate volume of MagneGST Binding/Wash Buffer, the MagneGST particles can be stored at 4℃ overnight. Do not allow the particles to dry.
2. Add 600 μl of cell lysate, prepared as described above, to the particles. Mix gently by pipetting or inverting.
3. Incubate with gentle mixing on a rotating platform or shaker for 30 min at 4℃ or room temperature. Note: Do not allow particles to settle for more than a few minutes, as this will reduce binding efficiency.
Washing:
1. Place the tube in the magnetic stand, and allow the MagneGST particles to be captured by the magnet.
2. Carefully remove the supernatant. Save the supernatant (flowthrough) for SDS-PAGE analysis, if desired.
3. Remove the tube from the magnetic stand. Add 250 μl of MagneGST Binding/Wash Buffer to the particles, and mix gently by pipetting or inverting. Incubate at room temperature or 4℃ for 5 min. Occasionally mix by inverting the tube.
4. Place the tube in the magnetic stand, and allow the MagneGST particles to be captured by the magnet.
5. Carefully remove the supernatant.
6. Remove the tube from the magnetic stand. Add 250 μl of MagneGST Binding/Wash Buffer to the particles, and mix gently by pipetting or inverting. The incubation is not necessary at this step.
7. Place the tube in the magnetic stand, and allow the MagneGST particles to be captured by the magnet.
8. Carefully remove the supernatant. Save the supernatant if analysis of wash solution is desired.
9. Repeat Washing Steps 6–8 times.
10. Peptide 200 μl sample for SDS-PAGE analysis.
Formation of a stable Spytag/ Spycatcher complex:
1. Centrifugation (6,500 rpm, 30 s), discard supernatant.
2. Add 600 μl protein tagged by Spytag, incubate at 37℃ for 15 min.
3. Repeat washing step.
4. Peptide 300 μl for SDS-PAGE analysis.
5. Add TEV protease to the rest solution, release protein of interest.
The reaction system is as follows:
| Fusion protein | 20 μg |
| 20×rTEV Buffer | 7.5 μl |
| 0.1 M DTT | 1.5 μl |
| rTEV protease | 1 μl |
| H2O | up to 150 μl |
6. Incubate at 4℃ for 5-6 h.
Bradford Protein Assay
For the Bradford protein assay we used Bradford Protein Assay Kit according to manufacturer's instructions.
SDS-PAGE
Casting the gel
1. Select and cast the appropriate base (separating) gel. The amounts of reagents required for two gels with dimensions 0.07 × 14 × 14 cm and containing 10% and 16% acrylamide are given in the table that follows. Do not degas the gel mixtures, because the gel buffer contains SDS. Overlay the poured gels with several drops of water. Leave the gels for about 30 min to polymerize. (Alternatively, precast gels can be purchased from vendors, and the protocol can be started from Step 3.)The freshly prepared ammonium persulfate (APS) solution and TEMED should be added last, immediately before pouring the gels, because these polymerize the gels.
2. Overlay the polymerized separating gel (10% or 16%, or 16%/6 M urea) directly with a 4% sample (stacking) gel prepared as indicated in the table in Step 1, except if resolution of proteins <5 kDa is desired. If resolution of proteins <5 kDa is desired, then use AB-6 instead of AB-3 for the separating gel and overlay the separating gel with a 1-cm 10% gel, made up as described in the table. The 16% separating gel and the overlaid 10% ‘spacer gel’ can be polymerized together if no glycerol is added to the 10% acrylamide gel mixture (the common role of glycerol in SDS gels is to increase the density of solutions and to facilitate gel casting; it has no obvious effect on protein separation). Introducing a 10% ‘spacer gel’ between 4% stacking and 16% separating gels considerably sharpens the bands for proteins and peptides of 1–5 kDa.
3. Adjust protein concentrations so that a suitable amount of protein can be loaded onto the gel. Concentrate samples, preferentially by techniques that do not increase the salt concentration (such as ultrafiltration). Roughly 0.2–1 μg of protein for each protein band (in 0.7 × 5 mm gel strips) is sufficient for Coomassie staining. Accordingly, the desired protein concentration in the sample is 0.1 mg/ml–1 for each protein band. For silver staining, 100-fold less protein may be sufficient. Depending on the requirements of protein detection and analysis, concentration of the sample may be necessary.The maximal protein load can be limited by large amounts of neutral detergent in the sample and by high concentrations of lipid when solubilizing biological membranes. SDS must always be in large excess over neutral detergents and/or lipids. For isolated mitochondrial membranes (70% protein, 30% lipid), for example, the optimized maximal protein load of sample wells 0.7 × 5 mm is 20 μg. Increasing the applied amount of protein to 40 μg, for example, may cause the individual protein bands to disappear in a diffuse background. Around 0.4% neutral detergent in the sample can be tolerated for direct mixing with SDS-containing sample incubation buffers and application to SDS gels. The incubation buffers and volumes described in Step 4 set a tenfold excess of SDS over the neutral detergent. Setting the SDS/neutral detergent ratio to <10 may result in a surprising result after staining: normally separated, large proteins may be detected in the upper gel areas, but the lower gel areas may be completely clear with no small proteins detectable.
4. Mix samples with SDS-containing sample buffers. The volume and buffer to be used depend on the origins of the samples. For low-density samples such as elution fractions from chromatographic columns, add 5 μl of reducing or nonreducing sample incubation buffer A or B (see REAGENTS) to 15 μl of sample. For high-density samples such as fractions from sucrose density gradients, add 5 μl of sample buffer C or D to 15 μl of sample. For pellet samples, resuspend the pellet in 15–20 μl of buffer A/4 or B/4.
Sample preparation and protein loading
5. Incubate samples at 37 °C for 15 min or for up to 60 min for samples that were in pellet form. Avoid boiling samples, because membrane proteins can irreversibly aggregate in SDS at temperatures >50 °C.
6. Mount the gels in the vertical electrophoresis apparatus (see EQUIPMENT), and add anode buffer as the lower electrode buffer and cathode buffer as the upper electrode buffer (anodes and cathodes are commonly marked red and black, respectively, by the suppliers).
7. Load samples under the cathode buffer. Apply 10-μl sample volumes to 0.7 × 5 mm sample wells.For the optimal resolution of peptides of 1–5 kDa, reduce the amount of SDS in the incubation buffers, for example, by fourfold and reduce the volume applied to 5 μl. Reducing the amount of SDS facilitates electrophoretic separation of peptides from the bulk of SDS. To avoid streaking of peptide bands, peptides and bulk SDS must be separated before the faster-migrating bulk SDS and the peptides immediately following reach the separating gel. The sample volume applied for Tricine–SDS-PAGE should not substantially exceed 10 μl, because stacking of proteins in the range 20–100 kDa is less efficient than in Laemmli–SDS-PAGE.
Electrophoresis conditions
8. Set running conditions appropriate to your type of gel; guidance on appropriate running conditions are given in the table below. Start electrophoresis with an initial voltage of 30 V and maintain at this voltage until the sample has completely entered the stacking gel. The next appropriate voltage step can then be applied. The initial current may be as high as 80 mA for a 0.7mm 10% gel. Gels may warm up, but the temperature should not exceed 35–40 °C. Approaching the end of the run, voltage can be gradually increased to shorten the total time of electrophoresis. Fast runs give better results than overnight runs, especially with 10% acrylamide gels. Alternatively, a constant power of 10 W per gel might be set to ensure an even distribution of heat. The specific settings for electrophoretic runs depend considerably on the apparatus used and its cooling capacity, the length and thickness of the gel, and the acrylamide concentration of the gel. The settings given above can be regarded only as general hints to approach reasonable experimental conditions. For initial runs, it seems advisable to test considerably lower voltage and wattage settings.
| 4% sample gel | 10% gel | 16% gel | 16% 6M urea | ||
| AB-3 | ml | 1 | 6 | 10 | 10 |
| Gel Buffer (3×) | ml | 3 | 10 | 10 | 10 |
| glycerol | g | - | 3 | 3 | - |
| Urea | g | - | - | - | 10.8 |
| Add water to final volume | ml | 12 | 30 | 30 | 30 |
| Polymerize by adding: | |||||
| APS (10%) | μl | 90 | 150 | 100 | 100 |
| TEMED | μl | 9 | 15 | 10 | 10 |
REAGENTS
| Buffer A/4 | buffer A diluted with 3 volumes of water |
| Buffer C | buffer A without glycerol |
| Buffer B/4 | buffer B diluted with 3 volumes of water |
| Buffer D | buffer B without glycerol |
Buffer A
| Component | Mass |
| SDS | 12 % |
| Fusion protein | 6 % |
| mercaptoethanol | 7.5 μl |
| glycerol | 30 % |
| Coomassie blue G-250 | 0.05 % |
| Tris/HCl (pH 7.0) | Tris/HCl (pH 7.0) |
Buffer B
| Component | Mass |
| SDS | 12 % |
| glycerol | 30 % |
| Coomassie blue G-250 | 0.05 % |
| Tris/HCl (pH 7.0) | 150 mM |
Electrode buffer
| Component | Mass |
| SDS | 12 % |
| Tris/ HCl | 300 mM |
| Acetic acid (pH 8.6) | 100 mM |
Device
Electromagnet separator
We try to design a rapid and continuous tool for Magnetosome separation. We poured crude AMB-1 cell lysate into a tube and switch it on, 220 / 110v alternating current through the rectifier into a 24V DC power, acting on the electromagnet. All Magnetosomes were adhered to one side of the tube by the magnetic force of the electromagnetic system. The waste solution was empty by releasing the clip at the bottom of the tube, and then used distilled water to wash Magnetosomes, the process was repeated more than three times, and the Magnetosomes were allowed to bind at the side of the tube by magnetic force. The final step was turning off the device, using PBS to resuspend Magnetosomes.

Fig.6 Electromagnet separator
The pulsed magnetic field generator
According to reference, the pulsed magnetic field could enhance Magnetosomes formation. So we design this device, the pulsed magnetic field generator, it is composed of the pulse signal generating circuit and the magnetic field generating part. The circuit generates pulse signal, and pass through DC electromagnet coils, which provide a highly homogenous pulsed magnetic field. The instrument was kept at 30℃ in a constant temperature chamber for AMB-1 incubation.

Fig.7 The pulsed magnetic field generator
Judging criteria
Bronze
1. Register the team, have a great summer, and plan to have fun at the Giant Jamboree.
Our team has been registered, we have had the best summer in lab and in human practice activities, and we expect to have lots of fun at the Giant Jamboree in Boston!
2. Meet all deliverables on the Requirements page.
1) We design our team wiki to let people understand our case better.
2) We prepare poster and presentation for Jamboree.
3) We submit parts, safety forms and judging forms completely and in time.
4) We submit DNA samples of our new parts to Registry
3. Create a page on our team wiki with clear attribution of each aspect of our project.
Our team consists of students who focus on experiment, website design, art and writing. We have clearly show work done by the students and done by others, including host labs, advisors, instructors, sponsors, professional website designers, artists, and commercial services in our team wiki.
4. Document at least one new standard BioBrick Part or Device central to our project and submit this part to the iGEM Registry and document a new application of a BioBrick part from a previous iGEM year.
Our new BioBricks can be found in the Parts page.
Sliver
1. Experimentally validate that at least one new BioBrick Part or Device of your own design and construction works as expected.
We document the characterization of this part in the Part’s and Device’s Registry entry and they can be searched in parts’, human practice’s and results’ pages of our team wiki. We have validated :
2. Help any registered iGEM team from high school, a different track, another university, or another institution in a significant way.
We have helped NEU_China to examine the effectiveness of the biobricks. For more details, see our Collaboration part.
3. Human Practices in iGEM. Demonstrate how your team has identified, investigated and addressed one or more of these issues in the context of your project.
Our activity focus on education, experimenters’ metal health, public perception. Our human practice is really interesting, see our human practice page in our wiki.
Gold
1. Integrated Human Practices.
We have expanded on our human practice by integrating our investigated issues like questionnaire about protein purification in many labs of different universities and scientific centers at first. After our experiments, we give them feedback of our new approach comparing with other approaches.
2. Improve a previous part or project.
We improved the function OR characterization of an existing BioBrick Part and enter this information in the Registry.
3. Proof of concept.
Our all parts consist of a BioBrick device and the device shows its real function as we expected. See more detail on our device part.
4. Demonstrate our work.
Our system works in the real simulated conditions in lab.
References
1. Honda, T., Yasuda, T., Tanaka, T., Hagiwara, K., Arai, T. and Yoshino, T. 2015. Functional expression of full-length TrkA in the prokaryotic host Magnetospirillum magneticum AMB-1 by using a magnetosome display system. Appl Environ Microbiol 81:1472-6.
2. Li, L., Fierer, J.O., Rapoport, T.A. and Howarth, M. 2014. Structural analysis and optimization of the covalent association between SpyCatcher and a peptide Tag. J Mol Biol 426:309-17.
3. Lin, Z., Zhao, Q., Zhou, B., Xing, L. and Xu, W. 2015. Cleavable self-aggregating tags (cSAT) for protein expression and purification. Methods Mol Biol 1258:65-78.
4. Sugamata, Y., Tanaka, T., Matsunaga, T. and Yoshino, T. 2014. Functional expression of an scFv on bacterial magnetic particles by in vitro docking. Biochem Biophys Res Commun 445:1-5
5. Wang, X., Liang, L., Song, T. and Wu, L. 2009. Magnetosome formation and expression of mamA, mms13, mms6 and magA in Magnetospirillum magneticum AMB-1 exposed to pulsed magnetic field. Curr Microbiol 59:221-6.
6. Yoshino, T., Kato, F., Takeyama, H., Nakai, M., Yakabe, Y. and Matsunaga, T. 2005. Development of a novel method for screening of estrogenic compounds using nano-sized bacterial magnetic particles displaying estrogen receptor. Analytica Chimica Acta 532:105-111.
7. Yoshino, T. and Matsunaga, T. 2006. Efficient and stable display of functional proteins on bacterial magnetic particles using mms13 as a novel anchor molecule. Appl Environ Microbiol 72:465-71.
8. Arakaki, A., Webb, J. and Matsunaga, T. 2003. A novel protein tightly bound to bacterial magnetic particles in Magnetospirillum magneticum strain AMB-1. J Biol Chem 278:8745-50.
9. Wang, X. and Liang, L. 2009. Effects of static magnetic field on magnetosome formation and expression of mamA, mms13, mms6 and magA in Magnetospirillum magneticum AMB-1.
10. Pan, Y., Li, N., Mu, J., Zhou, R., Xu, Y., Cui, D., Wang, Y. and Zhao, M. 2015. Biogenic magnetic nanoparticles from Burkholderia sp. YN01 exhibiting intrinsic peroxidase-like activity and their applications. Appl Microbiol Biotechnol 99:703-15.
11. Liu, Y., Li, G.R., Guo, F.F., Jiang, W., Li, Y. and Li, L.J. 2010. Large-scale production of magnetosomes by chemostat culture of Magnetospirillum gryphiswaldense at high cell density. Microb Cell Fact 9:99.
Partner