Team:SUSTech Shenzhen/Notebook/Protocol

Protocol
Notebook
Contents
- 1 Microfluidic Chips Production
- 2 iGEM Cell Culture(CHO-K1)
- 3 Molecular Experiment
- 3.1 AxyPrep Plasmid Miniprep Spin Protocol
- 3.2 E.Z.N.A.® Endo-Free Plasmid DNA Mini Kit II Protocol - Spin Protocol
- 3.3 E.Z.N.A.® Plasmid DNA Mini Kit I Protocol - Spin Protocol
- 3.4 E.Z.N.A.® Cycle Pure Kit - Centrifugation Protocol
- 3.5 E.Z.N.A.® Gel Extraction Kit - Spin Protocol
- 3.6 E.Z.N.A.® Plasmid DNA Mini Kit I Protocol - Spin Protocol
- 3.7 E.Z.N.A.® Cycle Pure Kit - Centrifugation Protocol
- 3.8 E.Z.N.A.® Gel Extraction Kit - Spin Protocol
- 3.9 GenElute™ HP Endotoxin-Free Plasmid Maxiprep Kit - Sigma-Aldrich(NA0410)
- 3.10 Power SYBR® Green PCR Master Mix Kit(life technologies,4368708)
- 3.11 TaKaRa-SYBR Premix Ex Taq II(Tli RNaseH Plus,RR820A)
- 3.12 PureLink Genomic DNA Mini Kit - Thermo Fisher Scientific(K1820-01)
- 3.13 Gibson Assembly® Master Mix – Assembly (E2611)
- 3.14 GeneMorph II Random Mutagenesis Kit(Agilent Technologies,Catalog #200550)
- 3.15 Transformation & Competent cell recovery
- 3.16 Mix&Go method.
- 3.17 T4 DNA Ligase(M0202)
- 3.18 Q5® High-Fidelity 2X Master Mix(M0492S)
- 3.19 DNA Polymerase I, Large (Klenow) Fragment(M0210S)
- 3.20 KOD DNA Polymerase(Merck Millipore@Novagen, TB320)
- 3.21 Quick Ligation™ Kit (M2200S)
- 3.22 Premix TaqTM (RR902A)
- 3.23 PrimeSTAR Max DNA Polymerase - Clontech(R045Q)
- 3.24 Ultra-Competent cells protocol
Microfluidic Chips Production
Work done by Yu Zhenming (sophomore) with the help of Chen Rifei (junior). Assistant professor Jaewon Park, docter Wang Yao and docter Zhang Rui have offered their advices.
After reading existing papers about the processing technology typically used in microfluidic chips production and endless trial experiment, we have formed our own processing protocol based on our equipment.
The microfluidic chips used in our project were all produced using this protocol.
Process Overview

SU-8 Photoresist can cross-link to a network of polymer when exposed to short wavelength light. If the cross-linked network has formed, it cannot be dissolved by the SU-8 developer. So if we place a photo mask to shade the light shine on the photoresist, we can make a copy of the pattern on the photo mask.
Both PDMS and glass contains silicon element. When they were treated by oxygen plasma, unstable hydroxyl group will form on the treated surface. When they get close enough, two hydroxyl group will dehydrate and bond together covalently.
Detailed Protocol
- Wash the glass mask holder by socking it in dilute ammonia water for over 1 hour, and refresh it with deionized water.
- Wash the glass mask holder by socking it in dilute hydrochloric acid for over 1 hour, and refresh it with deionized water.
- Wash the glass mask holder by socking it in positive photoresist remover for over 1 hour, and refresh it with deionized water.
- Dry the glass mask holder in the drying oven.
- Clean the mask film by wiping the two sides carefully on one direction with a clean paper socked in acetone.
- Clean the mask for the second time film by wiping the two sides carefully on one direction with a clean paper socked in alcohol or isopropyl alcohol.
- Fix the mask film on to the mask holder with tape.
- The tape can only touch the edges of the mask film in order to prevent contamination.
- Pour some SU-8 2100 photoresist in a small bottle, keep it still in the refrigerator for at least a week(two weeks recommend) to remove the bobbles inside the photoresist.
- Take the SU-8 photoresist out from the refrigerator, wait until the bottle hit room temperature, and carefully pour it on to a clean silicon wafer. The bottle should be held as close to the wafer as possible to prevent bobble from generating.
- Spin the wafer with photoresist on the spin coater with the following procedure.
- Spin at 500 rpm for 10 seconds with acceleration time of 5 seconds.
- Spin at 2000 rpm for 30 seconds with acceleration time of 5 seconds.
- Spin at 500 rpm for 5 seconds with acceleration time of 5 seconds.
- Stop with acceleration time of 5 seconds.
- Bake the wafer on 65℃ hotplate for 5 minutes.
- Bake the wafer on 95℃ hotplate for 30 minutes.
- Keep the wafer still in room temperature for more than 1 hour and wait until the photoresist is dry enough.
- Clean the backside of the wafer with a clean paper socked in SU-8 developer to remove excessive photoresist.
- Fix the wafer to the mask aligner.
- Place the mask holder on the wafer carefully.
- Expose the wafer with the mask aligner with the exposure energy of 220 mJ/cm2.
- Bake the wafer on 65℃ hot plate for 5 minutes.
- A visible pattern identical to the photomask will be seen in the film within 5 seconds after being placed on the hotplate.
- Bake the wafer on 95℃ hot plate for 12 minutes.
- Keep the wafer still in room temperature for 15 minutes and wait until the photoresist is dry enough.
- Pour fresh SU-8 developer into the container. Place the container on the shaking table and set the speed to 400rpm. Start the shaking table and wait for the speed to be stabilized.
- Put the wafer in the container and develop for 4 minutes.
- Spray and wash the developed image with fresh developer for approximately 10 seconds.
- Spray and wash the developed image with isopropyl alcohol for approximately 10 seconds.
- Air dry the wafer with nitrogen gun.
- Bake the wafer on 150℃ hot plate for 20 minutes.
- Check the developed image.
- Wait for the wafer to cool down.
- Check the final image of the photoresist. The final image usually has a lot of defects at the edges of the channels. And due to the low transmittance of SU-8 photoresist to the low-wavelength light, the photoresist at the top side of the channel will absorb higher energy than the photoresist at the bottom, causing a trapezoidal cross section profile.
- Mix about 30g PDMS base with about 3g curing agent (at the ratio of 10:1).
- Wrap the wafer with tinfoil and pour the PDMS mix on to the wafer.
- Put the wafer in the vacuum dryer to remove the bobbles inside.
- Bake the wafer in the 80℃ drying oven for 3 hours.
- Take the wafer out and rip off the tinfoil.
- Carefully remove PDMS from the wafer and cut it into pieces on a piece of clean paper.
- Spray and wash the PDMS with alcohol.
- Spray and wash the PDMS with deionized water.
- Air dry the wafer with nitrogen gun.
- Soak glass slides in 100g/L NaOH solution for 14~24 hours.
- Take the glass slides out, spray and wash them with deionized water.
- Spray and wash the glass slides with alcohol.
- Spray and wash the glass slides with deionized water.
- Air dry the wafer with nitrogen gun.
- Place the clean slides on a piece of tinfoil.
- Dry the glass slides in the drying oven
- Clean the glass slide in the ultra-violet ozone cleaner for 15 minutes.
- Take the slides out and wrap them with another piece of tinfoil.
- Punch the holes for the tube on the PDMS.
- Open the plasma cleaner and place the PDMS and the slide in the meddle. A piece of tinfoil should be placed under the PDMS.
- Treat them with oxygen plasma for 1.5 minutes at 300W and the oxygen flow rate of 0.6mL/min.
- Stop the plasma cleaner and open the cover as soon as possible. Press the treated sides together and apply pressure within 5 seconds.


iGEM Cell Culture(CHO-K1)
Cell maintenance and subculture
- Preheat the liquid materials at 37℃
- Discard the supernatant.
- Add 1ml PBS into one of the 6 well plate to wash and discard the PBS.
- Add 0.5ml 0.25% Trypsin-EDTA, place the plate at 37℃ for about 3 min. (For 0.05% trypsin-EDTA, digest for about 10min)
- Observe it under microscope to check whether the cell fall off from the plate bottom and become round shape.
- Add 2 volume of medium (contains FBS) to terminate the digestion.
- Add the mixture into 15ml tube and centrifuge at 200xg for 5min.
- Discard the supernatant. Add 1ml medium with FBS to resuspend.
- Use 10ul cell mixture to mix with 10ul 0.02% Trypan Blue to conduct cell counting by using Countstar apparatus.
- Add 20ul cell mixture into 24 well plate for 4 wells for each. Add 200ul cell mixture into 3 10cm dish for each. Shake and spread the cell evenly.
- Place the plates at 37℃ cell culture incubator.
Transfection
Using CHO-K1 cells and Lipofectamine® 3000
| 25μL opti-MEM + 1μL Lipo3000(0.75μL-1.5μ) | => | Mix Well | ||||
| => | Mix and incubate at room temperature for 5min | => | Add into cell | |||
| 25μL opti-MEM + 500ng DNA | => | + 1μL P3000 Mix well |
Cell culture medium antibiotics:
- Blasticidin (10ug/ml), puromycin (3ug/ml), 100X P/S(Penicillin+Streptomycin)
Cell freezing (CHO K1)
- Prepare freezing medium and store at 4°C until use. Prepare other materials in 37℃.
- Directly collect 1ml of supernatant from the cell culture into a 1.5ml Eppendorf tube for mycoplasma detection.
- Discard the medium in the plate. Wash with warm PBS for 2 times. (For 10 cm dish, 2ml PBS each time is OK). Discard the PBS.
- Add 2ml 0.05% trypsin-EDTA. Place the plate into 37℃ for 5 min. Observe under microscope to check whether the cells are in round shape. Gently tap the edge of the plate to let cells detach from the bottom. Add 2 volume (4 ml) of medium containing FBS to terminate digestion.
- Collect and centrifuge the cell suspension at 200 × g for 5 minutes. Aseptically decant supernatant without disturbing the cell pellet.
- Resuspend the cells in 10mL medium.
- Determine the total number of cells and percent viability using Countstar® cell and Trypan Blue exclusion. According to the desired viable cell density, calculate the required volume of freezing medium. The viable cell density we measured is 8*106/ml. We need 2*106 cells in one freeze tube, so we added 250μL medium inside one tube with 200μL serum(FBS) and 50μL DMSO(DMSO final concentration:10%).
- Add the cell mixture (cell mixture+FBS+DMSO) into the freezing tube with 2*106 cells for each.
- Place the freezing tube into the freezing box (controlled rate freezing,containing more than 250ml isopropanol). Pay attention not to let water exist in the freezing box well.
- Store them at –80°C overnight. (just longer than 2 hours is OK)
- Detect the mycoplasma, if no mycoplasma exists, place the freezing box into liquid nitrogen.
Mycoplasma Test
Sample group, positive control, negative control
PCR system (Total 50μL):
| Prime Star Premix | 25μL |
| Forward Primer | 2.5μL |
| Reverse Primer | 2.5μL |
| Cell Culture Supernatant | 3μL |
| ddH2O | 17μL |
| 95℃ | 30s | |||
| 98℃ | 10s | \ | ||
| 50℃ | 30s | x30 cycles | ||
| 72℃ | 40s | / | ||
| 72℃ | 120s | |||
| 4℃ | ∞ |
Cell Thawing
- Remove vial from Liquid Nitrogen or -140℃ freezer and immediately transfer to 37℃ water bath.
- While holding the tip of the vial, gently agitate the vial, being careful not to allow water to penetrate the cap or seal
- When completely thawed, transfer contents of vial to 15mL test tube
- Slowly add 10mL warm complete media and spin at 200xg for 5min
- Discard media and resuspend pellet in a volume of complete media appropriate for plate.
- Transfer cells to plate and incubate at 37C and 5%CO2
Molecular Experiment
AxyPrep Plasmid Miniprep Spin Protocol

- Collect 1-4 ml of overnight LB culture. Centrifuge at 12,000g for 1 minute to pellet the bacteria. Decant or pipette off as much of the supernatant as practical.
Note: When using rich broths such as LBG or 2×YT, reduce the culture volume by half. Excessive bacteria will reduce lysis efficiency, resulting in low yield and reduced purity of the plasmid DNA. Do not exceed 2 ml of bacterial culture grown in rich broth.
- Resuspend the bacterial pellet in 250 μl of Buffer S1 by vortexing. Please be sure that the bacteria are completely resuspended before proceeding.
Note: Be sure that RNase A has been added into Buffer S1.
- Add 250 μl of Buffer S2, and mix by gently inverting the tube for 4-6×. Do not vortex.
Note: Vigorous shaking or vortexing will cause shearing of the bacterial genomic DNA and result in the contamination of the plasmid DNA.
Note: After use, the buffer S2 bottle should be closed immediately in order to avoid neutralization of NaOH by ambient CO2.
Note: Buffer S3 (Step 4, below) must be added within 5 minutes. - Add 350 μl of Buffer S3, and mix by gently inverting 6-8×. Centrifuge at 12,000×g for 10 minutes to clarify the lysate. Do not vortex.
Note: Vigorous shaking or vortexing will result in contamination with genomic DNA.
- Place a Miniprep column into an uncapped 2 ml Microfuge tube (provided). Transfer the clarified supernatant from Step 4 into the Miniprep column. Transfer the Miniprep column and 2 ml Microfuge tube to microcentrifuge and spin at 12,000×g for 1 minute.
- Optional step: Buffer W1 Wash
- Washing with Buffer W1 is required only in cases where the plasmid has been propagated in an endA+ bacterial strain. These strains often exhibit high levels of endonuclease activity which will degrade the plasmid DNA.
- Proceed to Step 7 if an endA- bacterial strain is used.
- Pipette 500 μl of Buffer W1 into each Miniprep column. Centrifuge at 12,000×g for 1 minute.
- Pipette 700 μl of Buffer W2 into each Miniprep column. Centrifuge at 12,000×g for 1 minute.
Note: Make sure that the volume of ethanol specified on the bottle label has been added to the Buffer W2 concentrate.
- Optional Step: Discard the filtrate from the 2 ml Microfuge tube. Place the Miniprep column back into the 2 ml Microfuge tube. Add 700 μl of Buffer W2 to the Miniprep column and centrifuge at 12,000×g for 1 minute.
Note: Two washes with Buffer W2 are used to ensure the complete removal of salt, eliminating potential problems in subsequent enzymatic reactions.
- Discard filtrate from the 2 ml Microfuge tube. Place the Miniprep column back into the 2 ml Microfuge tube. Centrifuge at 12,000×g for 1 minute.
- Transfer the Miniprep column into a clean 1.5 ml Microfuge tube (provided). To elute the purified plasmid DNA, add 60~80 μl of Eluent (or deionized water) to the center of the membrane. Let it stand for 1 min at room temperature. Centrifuge at 12,000×g for 1 minute.
E.Z.N.A.® Endo-Free Plasmid DNA Mini Kit II Protocol - Spin Protocol
- For the isolation of 40-70 μg of high copy plasmid DNA from a 10-15 mL culture. All centrifugation should be performed at room temperature unless otherwise noted. For low copy number plasmids refer to Page 6. This protocol is designed to isolate plasmid DNA from E. coli grown in an overnight 1-5 mL LB culture.
Materials and Equipment to be Supplied by User:
- 100% ethanol
- Isopropanol
- Centrifuge capable of at least 5,000 x g with swing buckets
- Microcentrifuge capable of at least 13,000 x g
- Nuclease-free 1.5 mL or 2 mL microcentrifuge tubes
- Ice bucket
- Culture tubes
- Optional: sterile deionized water
- Optional: water bath or incubator capable of 65°C
- Optional: 3M NaOH
Before Starting:
- Chill N3 Buffer on ice
- Heat Elution Buffer to 70°C if plasmid DNA is >10 kb
- Prepare DNA Wash Buffer, HBC Buffer, and Solution I according to the instructions in the Preparing Reagents section.
- Isolate a single colony from a freshly streaked selective plate, and inoculate a culture of 10- 15 mL LB medium containing the appropriate selective antibiotic. Incubate for ~12-16 hr at 37°C with vigorous shaking (~300 rpm). Use a 50 mL culture tube or a flask with a volume of at least 4 times the volume of the culture. It is strongly recommended that E. coli be used for routine plasmid isolation. An OD600 reading between 2.0 and 3.0 is an indication that bacterial cells are at an optimal density for harvesting, and plasmid DNA isolation.
- Centrifugation at 5,000 x g for 10 minutes at room temperature.
- Decant or aspirate the medium and discard.
- Add 500 µL Solution I/RNase A. Vortex or pipet up and down to mix thoroughly. Complete resuspension of cell pellet is vital for obtaining good yields.
-
Note: RNase A must be added to Solution I before use. Please see the instructions in the Preparing Reagents section.
-
- Transfer suspension into a new 2 mL microcentrifuge tube.
- Add 500 µL Solution II. Invert and gently rotate the tube several times to obtain a clear lysate. A 2-3 minute incubation may be necessary.
-
Note: Avoid vigorous mixing as this will shear chromosomal DNA and lower plasmid purity. Do not allow the lysis reaction to proceed more than 5 minutes. Store Solution II tightly capped when not in use to avoid acidification from CO2 in the air.
-
- Add 250 μL ice cold N3 Buffer. Gently invert several times until a flocculent white precipitate forms.
- Centrifuge at maximum speed (≥13,000 x g) for 10 minutes. A compact white pellet will form. Promptly proceed to the next step.
- Transfer the cleared lysate to a new 1.5 mL microcentrifuge tube. Measure the volume of the cleared lysate transferred.
- Add 1 volume ETR Binding Buffer. Invert the tube 10 times to mix thoroughly.
-
Note: If you transferred 500 µL cleared lysate, then add 500 µL ETR Binding Buffer.
-
- Insert a HiBind® DNA Mini Column II into a 2 mL Collection Tube.
- Optional Protocol for Column Equilibration:
- Add 100 µL 3M NaOH to the HiBind® DNA Mini Column.
- Centrifuge at maximum speed for 30-60 seconds.
- Discard the filtrate and reuse the collection tube
- Transfer 700 μL cleared supernatant from Step 10 by CAREFULLY aspirating it into the HiBind® DNA Mini Column II. Be careful not to disturb the pellet and that no cellular debris is transferred to the HiBind® DNA Mini Column II.
- Centrifuge at maximum speed for 1 minute.
- Discard the filtrate and reuse the collection tube.
- Repeat Steps 12-14 until all of the cleared lysate has been transferred to the column.
- Add 500 μl ETR Wash Buffer.
- Centrifuge at maximum speed for 1 minute.
- Discard the filtrate and reuse the collection tube.
- Add 500 μl HBC Buffer.
-
Note: HBC Buffer must be diluted with isopropanol before use. Please see Page 4 for instructions.
-
- Centrifuge at maximum speed for 1 minute.
- Discard the filtrate and reuse collection tube.
- Add 700 μl DNA Wash Buffer.
-
Note: DNA Wash Buffer must be diluted with 100% ethanol prior to use.
-
- Centrifuge at maximum speed for 1 minute.
- Discard the filtrate and reuse the collection tube.
- Repeat Steps 22-24 for a second DNA Wash Buffer wash step.
- Centrifuge the empty HiBind® DNA Mini Column II for 2 minutes at maximum speed to dry the column matrix.
-
Note: It is important to dry the HiBind® DNA Mini Column II matrix before elution. Residual ethanol may interfere with downstream applications.
-
- Transfer the HiBind® DNA Mini Column II to a clean 1.5 mL microcentrifuge tube.
- Add 50-100μl Elution Buffer or sterile deionized water directly to the center of the column membrane.
-
Note: The efficiency of eluting DNA from the HiBind® DNA Mini Column II is dependent on pH. If using sterile deionized water, make sure that the pH is around 8.5.
-
- Let sit at room temperature for 1 minute.
- Centrifuge at maximum speed for 1 minute.
-
Note: This represents approximately 70% of bound DNA. An optional second elution will yield any residual DNA, though at a lower concentration.
-
- Store DNA at -20℃.
E.Z.N.A.® Plasmid DNA Mini Kit I Protocol - Spin Protocol
Materials and Equipment to be Supplied by User:
- 100% ethanol
- Microcentrifuge capable of at least 13,000 x g
- Nuclease-free 1.5 mL or 2 mL microcentrifuge tubes
- Culture tubes
- Optional: sterile deionized water
- Optional: water bath or incubator capable of 70°C
- Optional: 3M NaOH solution
Before Starting:
- Heat Elution Buffer to 70°C if plasmid DNA is >10 kb
- Prepare DNA Wash Buffer and Solution I according to the instructions in the Preparing Reagents section.
- Isolate a single colony from a freshly streaked selective plate, and inoculate a culture of 1- 5 mL LB medium containing the appropriate selective antibiotic. Incubate for ~12-16 hours at 37°C with vigorous shaking (~ 300 rpm). Use a 10-20 mL culture tube or a flask with a volume of at least 4 times the volume of the culture. It is strongly recommended that an endA negative strain of E. coli be used for routine plasmid isolation. Examples of such strains include DH5a® and JM109®.
- Centrifuge at 10,000 x g for 1 minute at room temperature.
- Decant or aspirate and discard the culture media.
- Add 250 µL Solution I/RNase A. Vortex or pipet up and down to mix thoroughly. Complete resuspension of cell pellet is vital for obtaining good yields.
-
Note: RNase A must be added to Solution I before use. Please see the instructions in the Preparing Reagents section.
-
- Transfer suspension into a new 1.5 mL microcentrifuge tube.
- Add 250 µL Solution II. Invert and gently rotate the tube several times to obtain a clear lysate. A 2-3 minute incubation may be necessary.
-
Note: Avoid vigorous mixing as this will shear chromosomal DNA and lower plasmid purity. Do not allow the lysis reaction to proceed more than 5 minutes. Store Solution II tightly capped when not in use to avoid acidification from CO2 in the air.
-
- Add 350 µL Solution III. Immediately invert several times until a flocculent white precipitate forms.
-
Note: It is vital that the solution is mixed thoroughly and immediately after the addition of Solution III to avoid localized precipitation.
-
- Centrifuge at maximum speed (≥13,000 x g) for 10 minutes. A compact white pellet will form. Promptly proceed to the next step.
- Insert a HiBind® DNA Mini Column into a 2 mL Collection Tube.
- Optional Protocol for Column Equilibration:
- Add 100 µL 3M NaOH to the HiBind® DNA Mini Column.
- Centrifuge at maximum speed for 30-60 seconds.
- Discard the filtrate and reuse the collection tube.
- Transfer the cleared supernatant from Step 8 by CAREFULLY aspirating it into the HiBind® DNA Mini Column. Be careful not to disturb the pellet and that no cellular debris is transferred to the HiBind® DNA Mini Column.
- Centrifuge at maximum speed for 1 minute.
- Discard the filtrate and reuse the collection tube.
- Add 500 µL HB Buffer.
- Centrifuge at maximum speed for 1 minute.
- Discard the filtrate and reuse collection tube.
- Add 700 μL DNA Wash Buffer.
-
Note: DNA Wash Buffer must be diluted with 100% ethanol prior to use.
-
- Centrifuge at maximum speed for 1 minute.
- Discard the filtrate and reuse the collection tube.
- Optional: Repeat Steps 16-18 for a second DNA Wash Buffer wash step.
- Centrifuge the empty HiBind® DNA Mini Column for 2 minutes at maximum speed to dry the column matrix.
-
Note: It is important to dry the HiBind® DNA Mini Column matrix before elution. Residual ethanol may interfere with downstream applications.
-
- Transfer the HiBind® DNA Mini Column to a clean 1.5 mL microcentrifuge tube.
- Add 30-100 μL Elution Buffer or sterile deionized water directly to the center of the column membrane.
-
Note: The efficiency of eluting DNA from the HiBind® DNA Mini Column is dependent on pH. If using sterile deionized water, make sure that the pH is around 8.5.
-
- Let sit at room temperature for 1 minute.
- Centrifuge at maximum speed for 1 minute.
-
Note: This represents approximately 70% of bound DNA. An optional second elution will yield any residual DNA, though at a lower concentration.
-
- Store DNA at -20℃.
E.Z.N.A.® Cycle Pure Kit - Centrifugation Protocol
Materials and Equipment to be Supplied by User:
- Microcentrifuge capable of at least 13,000 x g
- Nuclease-free 1.5 mL microcentrifuge tubes
- 100% ethanol
- Optional: Sterile deionized water or TE Buffer
- For Fragments < 200 BP, 100% Isopropanol
Before Starting:
- Prepare DNA Wash Buffer according to the " Preparing Reagents" section.
- Perform agarose gel/ethidium bromide electrophoresis to analyze PCR product.
- Determine the volume of your PCR reaction.
- Transfer the sample into a clean 1.5 mL microcentrifuge tube.
- Add 4-5 volumes CP Buffer. For PCR products smaller than 200 bp, add 5 volumes CP Buffer and 0.4 V 100 % Isopropanol.
-
Note: Volume refers to the size of your PCR reaction. For example, if your PCR reaction is 100 µL and is smaller than 200 bp, you would use 500 µL CP Buffer abd 40 µL Isopropanol.
-
- Vortex to mix thoroughly. Briefly centrifuge to collect any drops from the inside of the lid.
- Insert a HiBind® DNA Mini Column into a 2 mL Collection Tube (provided).
- Add the sample from Step 5 to the HiBind® DNA Mini Column.
- Centrifuge at maximum speed (≥13,000 x g) for 1 minute at room temperature.
- Discard the filtrate and reuse collection tube.
- Add 700 μL DNA Wash Buffer.
- Centrifuge at maximum speed for 1 minute.
-
Note: DNA Wash Buffer must be diluted with ethanol before use. Please see the Preparing Reagents section.
-
- Discard the filtrate and reuse collection tube.
- Repeat Steps 10-12 for a second DNA Wash Buffer wash step.
- Centrifuge the empty HiBind® DNA Mini Column at maximum speed for 2 minutes to dry the column.
-
Note: This step is critical for removal of trace ethanol that may interfere with downstream applications.
-
- Transfer the HiBind®DNA Mini Column into a clean 1.5 mL microcentrifuge tube (not provided).
- Add 30-50 μL Elution Buffer, TE Buffer, or sterile deionized water directly to the center of column matrix.
- Let sit at room temperature for 2 minutes.
- Centrifuge at maximum speed for 1 minute.
-
Note: This represents approximately 80-90% of bound DNA. An optional second elution will yield any residual DNA, though at a lower concentration.
-
- Store DNA at -20℃.
E.Z.N.A.® Gel Extraction Kit - Spin Protocol
Materials and Equipment to be Supplied by User:
- Heat block or water bath capable of 60°C
- Microcentrifuge capable of at least 13,000 x g
- Vortexer
- Nuclease-free 1.5 mL microcentrifuge tubes
- 100% ethanol
- Optional: 5M Sodium Acetate, pH 5.2
- Optional: Sterile deionized water
Before starting:
- Prepare SPW Wash Buffer according to the " Preparing Reagents" section.
- Set heating block or water bath to 60°C
-
Note: The yellow color of the Binding Buffer (XP2) signifies a pH of ≤ 7.5.
- Perform agarose gel/ethidium bromide electrophoresis to fractionate DNA fragments. Any type or grade of agarose may be used. However, it is strongly recommended that fresh TAE buffer or TBE buffer be used as running buffer. Do not reuse running buffer as its pH will increase and reduce yields.
- When adequate separation of bands has occurred, carefully excise the DNA fragment of interest using a wide, clean, sharp scalpel. Minimize the size of the gel slice by removing extra agarose.
- Determine the appropriate volume of the gel slice by weighing it in a clean 1.5 mL microcentrifuge tube. Assuming a density of 1 g/mL, the volume of gel is derived as follows: a gel slice of mass 0.3 g will have a volume of 0.3 mL.
- Add 1 volume Binding Buffer (XP2).
- Incubate at 60°C for 7 minutes or until the gel has completely melted. Vortex or shake the tube every 2-3 minutes.
- Important: Monitor the pH of the Gel/Binding Buffer mixture after the gel has completely dissolved. DNA yields will significantly decrease when the pH > 8.0. If the color of the mixture becomes orange or red, add 5 µL 5M sodium acetate (pH 5.2) to bring the pH down. After this adjustment, the color of the Gel/Binding Buffer mixture should be light yellow.
- Insert a HiBind® DNA Mini Column in a 2 mL Collection Tube.
- Add no more than 700 μL DNA/agarose solution from Step 5 to the HiBind® DNA Mini Column.
- Centrifuge at 10,000 x g for 1 minute at room temperature.
- Discard the filtrate and reuse collection tube.
- Repeat Steps 7-9 until all of the sample has been transferred to the column.
- Add 300 µL Binding Buffer (XP2).
- Centrifuge at maximum speed (≥13,000 x g) for 1 minute at room temperature.
- Discard the filtrate and reuse collection tube.
- Add 700 μL SPW Wash Buffer.
-
Note: SPW Wash Buffer must be diluted with 100% ethanol prior to use.
-
- Centrifuge at maximum speed for 1 minute at room temperature.
- Discard the filtrate and reuse collection tube.
- Optional: Repeat Steps 14-16 for a second SPW Wash Buffer wash step. Perform the second wash step for any salt sensitive downstream applications.
- Centrifuge the empty HiBind®DNA Mini Column for 2 minutes at maximum speed to dry the column matrix.
-
Note: It is important to dry the HiBind®DNA Mini Column matrix before elution. Residual ethanol may interfere with downstream applications.
-
- Transfer the HiBind®DNA Mini Column to a clean 1.5 mL microcentrifuge tube.
- Add 30-50 μL Elution Buffer or deionized water directly to the center of the column membrane.
-
Note: The efficiency of eluting DNA from the HiBind®DNA Mini Column is dependent on pH. If eluting DNA with deionized water, make sure that the pH is around 8.5.
-
- Let sit at room temperature for 2 minutes.
- Centrifuge at maximum speed for 1 minute.
-
Note: This represents approximately 70% of bound DNA. An optional second elution will yield any residual DNA, though at a lower concentration.
-
- Store DNA at -20℃.
E.Z.N.A.® Plasmid DNA Mini Kit I Protocol - Spin Protocol
Materials and Equipment to be Supplied by User:
- 100% ethanol
- Microcentrifuge capable of at least 13,000 x g
- Nuclease-free 1.5 mL or 2 mL microcentrifuge tubes
- Culture tubes
- Optional: sterile deionized water
- Optional: water bath or incubator capable of 70°C
- Optional: 3M NaOH solution
Before Starting:
- Heat Elution Buffer to 70°C if plasmid DNA is >10 kb
- Prepare DNA Wash Buffer and Solution I according to the instructions in the Preparing Reagents section.
- Isolate a single colony from a freshly streaked selective plate, and inoculate a culture of 1- 5 mL LB medium containing the appropriate selective antibiotic. Incubate for ~12-16 hours at 37°C with vigorous shaking (~ 300 rpm). Use a 10-20 mL culture tube or a flask with a volume of at least 4 times the volume of the culture. It is strongly recommended that an endA negative strain of E. coli be used for routine plasmid isolation. Examples of such strains include DH5a® and JM109®.
- Centrifuge at 10,000 x g for 1 minute at room temperature.
- Decant or aspirate and discard the culture media.
- Add 250 µL Solution I/RNase A. Vortex or pipet up and down to mix thoroughly. Complete resuspension of cell pellet is vital for obtaining good yields.
-
Note: RNase A must be added to Solution I before use. Please see the instructions in the Preparing Reagents section.
-
- Transfer suspension into a new 1.5 mL microcentrifuge tube.
- Add 250 µL Solution II. Invert and gently rotate the tube several times to obtain a clear lysate. A 2-3 minute incubation may be necessary.
-
Note: Avoid vigorous mixing as this will shear chromosomal DNA and lower plasmid purity. Do not allow the lysis reaction to proceed more than 5 minutes. Store Solution II tightly capped when not in use to avoid acidification from CO2 in the air.
-
- Add 350 µL Solution III. Immediately invert several times until a flocculent white precipitate forms.
-
Note: It is vital that the solution is mixed thoroughly and immediately after the addition of Solution III to avoid localized precipitation.
-
- Centrifuge at maximum speed (≥13,000 x g) for 10 minutes. A compact white pellet will form. Promptly proceed to the next step.
- Insert a HiBind® DNA Mini Column into a 2 mL Collection Tube.
- Optional Protocol for Column Equilibration
- Add 100 µL 3M NaOH to the HiBind® DNA Mini Column.
- Centrifuge at maximum speed for 30-60 seconds.
- Discard the filtrate and reuse the collection tube.
- Transfer the cleared supernatant from Step 8 by CAREFULLY aspirating it into the HiBind® DNA Mini Column. Be careful not to disturb the pellet and that no cellular debris is transferred to the HiBind® DNA Mini Column.
- Centrifuge at maximum speed for 1 minute.
- Discard the filtrate and reuse the collection tube.
- Add 500 µL HB Buffer.
- Centrifuge at maximum speed for 1 minute. Discard the filtrate and reuse collection tube.
- Add 700 μL DNA Wash Buffer.
-
Note: DNA Wash Buffer must be diluted with 100% ethanol prior to use.
-
- Centrifuge at maximum speed for 1 minute.
- Discard the filtrate and reuse the collection tube.
- Optional: Repeat Steps 16-18 for a second DNA Wash Buffer wash step.
- Centrifuge the empty HiBind® DNA Mini Column for 2 minutes at maximum speed to dry the column matrix.
-
Note: It is important to dry the HiBind® DNA Mini Column matrix before elution. Residual ethanol may interfere with downstream applications.
-
- Transfer the HiBind® DNA Mini Column to a clean 1.5 mL microcentrifuge tube.
- Add 30-100 μL Elution Buffer or sterile deionized water directly to the center of the column membrane.
-
Note: The efficiency of eluting DNA from the HiBind® DNA Mini Column is dependent on pH. If using sterile deionized water, make sure that the pH is around 8.5.
-
- Let sit at room temperature for 1 minute.
- Centrifuge at maximum speed for 1 minute.
-
Note: This represents approximately 70% of bound DNA. An optional second elution will yield any residual DNA, though at a lower concentration.
-
- Store DNA at -20℃.
E.Z.N.A.® Cycle Pure Kit - Centrifugation Protocol
Materials and Equipment to be Supplied by User:
- Microcentrifuge capable of at least 13,000 x g
- Nuclease-free 1.5 mL microcentrifuge tubes
- 100% ethanol
- Optional: Sterile deionized water or TE Buffer
- For Fragments < 200 BP, 100% Isopropanol
Before Starting:
- Prepare DNA Wash Buffer according to the " Preparing Reagents" section.
- Perform agarose gel/ethidium bromide electrophoresis to analyze PCR product.
- Determine the volume of your PCR reaction.
- Transfer the sample into a clean 1.5 mL microcentrifuge tube.
- Add 4-5 volumes CP Buffer. For PCR products smaller than 200 bp, add 5 volumes CP Buffer and 0.4 V 100 % Isopropanol.
-
Note: Volume refers to the size of your PCR reaction. For example, if your PCR reaction is 100 µL and is smaller than 200 bp, you would use 500 µL CP Buffer abd 40 µL Isopropanol.
-
- Vortex to mix thoroughly. Briefly centrifuge to collect any drops from the inside of the lid.
- Insert a HiBind® DNA Mini Column into a 2 mL Collection Tube (provided).
- Add the sample from Step 5 to the HiBind® DNA Mini Column.
- Centrifuge at maximum speed (≥13,000 x g) for 1 minute at room temperature.
- Discard the filtrate and reuse collection tube.
- Add 700 μL DNA Wash Buffer.
- Centrifuge at maximum speed for 1 minute.
-
Note: DNA Wash Buffer must be diluted with ethanol before use. Please see the Preparing Reagents section.
-
- Discard the filtrate and reuse collection tube.
- Repeat Steps 10-12 for a second DNA Wash Buffer wash step.
- Centrifuge the empty HiBind® DNA Mini Column at maximum speed for 2 minutes to dry the column.
-
Note: This step is critical for removal of trace ethanol that may interfere with downstream applications.
-
- Transfer the HiBind®DNA Mini Column into a clean 1.5 mL microcentrifuge tube (not provided).
- Add 30-50 μL Elution Buffer, TE Buffer, or sterile deionized water directly to the center of column matrix.
- Let sit at room temperature for 2 minutes.
- Centrifuge at maximum speed for 1 minute.
-
Note: This represents approximately 80-90% of bound DNA. An optional second elution will yield any residual DNA, though at a lower concentration.
-
- Store DNA at -20℃.
E.Z.N.A.® Gel Extraction Kit - Spin Protocol
Materials and Equipment to be Supplied by User:
- Heat block or water bath capable of 60°C
- Microcentrifuge capable of at least 13,000 x g
- Vortexer
- Nuclease-free 1.5 mL microcentrifuge tubes
- 100% ethanol
- Optional: 5M Sodium Acetate, pH 5.2
- Optional: Sterile deionized water
Before starting:
- Prepare SPW Wash Buffer according to the " Preparing Reagents" section.
- Set heating block or water bath to 60°C
-
Note: The yellow color of the Binding Buffer (XP2) signifies a pH of ≤ 7.5.
-
- Perform agarose gel/ethidium bromide electrophoresis to fractionate DNA fragments. Any type or grade of agarose may be used. However, it is strongly recommended that fresh TAE buffer or TBE buffer be used as running buffer. Do not reuse running buffer as its pH will increase and reduce yields.
- When adequate separation of bands has occurred, carefully excise the DNA fragment of interest using a wide, clean, sharp scalpel. Minimize the size of the gel slice by removing extra agarose.
- Determine the appropriate volume of the gel slice by weighing it in a clean 1.5 mL microcentrifuge tube. Assuming a density of 1 g/mL, the volume of gel is derived as follows: a gel slice of mass 0.3 g will have a volume of 0.3 mL.
- Add 1 volume Binding Buffer (XP2).
- Incubate at 60°C for 7 minutes or until the gel has completely melted. Vortex or shake the tube every 2-3 minutes.
- Important: Monitor the pH of the Gel/Binding Buffer mixture after the gel has completely dissolved. DNA yields will significantly decrease when the pH > 8.0. If the color of the mixture becomes orange or red, add 5 µL 5M sodium acetate (pH 5.2) to bring the pH down. After this adjustment, the color of the Gel/Binding Buffer mixture should be light yellow.
- Insert a HiBind® DNA Mini Column in a 2 mL Collection Tube.
- Add no more than 700 μL DNA/agarose solution from Step 5 to the HiBind® DNA Mini Column.
- Centrifuge at 10,000 x g for 1 minute at room temperature.
- Discard the filtrate and reuse collection tube.
- Repeat Steps 7-9 until all of the sample has been transferred to the column.
- Add 300 µL Binding Buffer (XP2).
- Centrifuge at maximum speed (≥13,000 x g) for 1 minute at room temperature.
- Discard the filtrate and reuse collection tube.
- Add 700 μL SPW Wash Buffer.
-
Note: SPW Wash Buffer must be diluted with 100% ethanol prior to use.
-
- Centrifuge at maximum speed for 1 minute at room temperature.
- Discard the filtrate and reuse collection tube.
- Optional: Repeat Steps 14-16 for a second SPW Wash Buffer wash step. Perform the second wash step for any salt sensitive downstream applications.
- Centrifuge the empty HiBind®DNA Mini Column for 2 minutes at maximum speed to dry the column matrix.
-
Note: It is important to dry the HiBind®DNA Mini Column matrix before elution. Residual ethanol may interfere with downstream applications.
-
- Transfer the HiBind®DNA Mini Column to a clean 1.5 mL microcentrifuge tube.
- Add 30-50 μL Elution Buffer or deionized water directly to the center of the column membrane.
-
Note: The efficiency of eluting DNA from the HiBind®DNA Mini Column is dependent on pH. If eluting DNA with deionized water, make sure that the pH is around 8.5.
-
- Let sit at room temperature for 2 minutes.
- Centrifuge at maximum speed for 1 minute.
-
Note: This represents approximately 70% of bound DNA. An optional second elution will yield any residual DNA, though at a lower concentration.
-
- Store DNA at -20℃.
GenElute™ HP Endotoxin-Free Plasmid Maxiprep Kit - Sigma-Aldrich(NA0410)


Power SYBR® Green PCR Master Mix Kit(life technologies,4368708)
- Applied Biosystems StepOne and StepOnePlus Real-Time PCR Systems—Standard Curve Experiments(Getiing Started Guide,4376784)
- TaKaRa-One Step SYBR PrimeScript RT-PCR Kit II(RR086A)


TaKaRa-SYBR Premix Ex Taq II(Tli RNaseH Plus,RR820A)


PureLink Genomic DNA Mini Kit - Thermo Fisher Scientific(K1820-01)


Gibson Assembly® Master Mix – Assembly (E2611)
Protocols.io also provides an interactive version of this protocol where you can discover and share optimizations with the research community.
Optimal Quantities
NEB recommends a total of 0.02–0.5 pmols of DNA fragments when 1 or 2 fragments are being assembled into a vector and 0.2–1.0 pmoles of DNA fragments when 4–6 fragments are being assembled. Efficiency of assembly decreases as the number or length of fragments increases. To calculate the number of pmols of each fragment for optimal assembly, based on fragment length and weight, we recommend using NEB's online tool, NEBioCalculator , or using the following formula:
pmols = (weight in ng) x 1,000 / (base pairs x 650 daltons)
50 ng of 5000 bp dsDNA is about 0.015 pmols.
50 ng of 500 bp dsDNA is about 0.15 pmols.
The mass of each fragment can be measured using the NanoDrop instrument, absorbance at 260 nm or estimated from agarose gel electrophoresis followed by ethidium bromide staining.
Assembly Protocol:
- Set up the following reaction on ice:
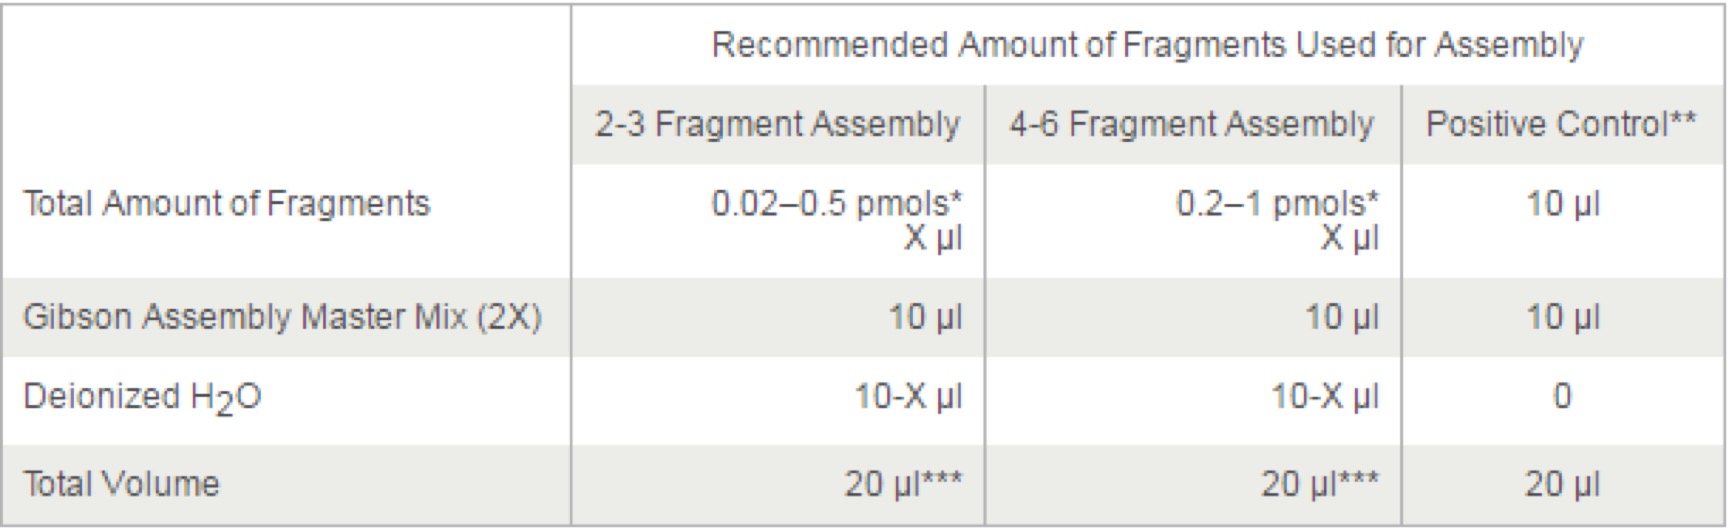
- Optimized cloning efficiency is 50–100 ng of vectors with 2–3 fold of excess inserts. Use 5 times more of inserts if size is less than 200 bps. Total volume of unpurified PCR fragments in Gibson Assembly reaction should not exceed 20%.
- Control reagents are provided for 5 experiments.
- If greater numbers of fragments are assembled, additional Gibson Assembly Master Mix may be required.
- Control reagents are provided for 5 experiments.
- Optimized cloning efficiency is 50–100 ng of vectors with 2–3 fold of excess inserts. Use 5 times more of inserts if size is less than 200 bps. Total volume of unpurified PCR fragments in Gibson Assembly reaction should not exceed 20%.
- Incubate samples in a thermocycler at 50°C for 15 minutes when 2 or 3 fragments are being assembled or 60 minutes when 4-6 fragments are being assembled. Following incubation, store samples on ice or at -20°C for subsequent transformation.

GeneMorph II Random Mutagenesis Kit(Agilent Technologies,Catalog #200550)


Transformation & Competent cell recovery
- Get competent cell (DH5α) from -80℃,lay on ice for 15mins till melted.
- Add plasmids according to the table above, gently blow to mix well.
- Incubate on ice for 30mins.
- Incubate in 42℃ water bath for 90s.
- Lay on ice for 5mins.
- Add 300μl LB, 37℃, 220rpm for 20mins.
- Add 300μl Amp+ LB, 37℃, 220rpm for 20mins.
- Centrifuge at 5000rpm, 1min. Drop 400μl suspension.
- Mix the left 200μl gently, spread plate.
Mix&Go method.
- Quickly thaw: remove "Mix&Go" hyper-efficient competent cells from -80℃ freezer and water flow till 50% of the cells melt.
- Add DNA: DNA volume is less than 1/10 volume of competent cells. (blow and suck for mixing )
- Heat shock: heat shock at 42℃ water bath for 45s.
- Spread the plates: remove LB(Amp+) plates from 4℃refrigerator,and spread all the bacterial on the plates. Overnight culture at 37℃ incubator (12~16hours).
T4 DNA Ligase(M0202)
- Set up the following reaction in a microcentrifuge tube on ice.(T4 DNA Ligase should be added last. Note that the table shows a ligation using a molar ratio of 1:3 vector to insert for the indicated DNA sizes.) Use NEBioCalculator to calculate molar ratios.

- The T4 DNA Ligase Buffer should be thawed and resuspended at room temperature.
- Gently mix the reaction by pipetting up and down and microfuge briefly.
- For cohesive (sticky) ends, incubate at 16°C overnight or room temperature for 10 minutes.
- For blunt ends or single base overhangs, incubate at 16°C overnight or room temperature for 5. 2 hours (alternatively, high concentration T4 DNA Ligase can be used in a 10 minute ligation).
- Heat inactivate at 65°C for 10 minutes.
- Chill on ice and transform 1-5 μl of the reaction into 50 μl competent cells

Q5® High-Fidelity 2X Master Mix(M0492S)
We recommend assembling all reaction components on ice and quickly transferring the reactions to a thermocycler preheated to the denaturation temperature (98°C). All components should be mixed prior to use.

-
Notes: Gently mix the reaction. Collect all liquid to the bottom of the tube by a quick spin if necessary. Overlay the sample with mineral oil if using a PCR machine without a heated lid.
-
Transfer PCR tubes to a PCR machine and begin thermocycling.
Thermocycling Conditions for a Routine PCR:

-
NOTE: Template: Use of high quality, purified DNA templates greatly enhances the success of PCR. Recommended amounts of DNA template for a 50 µl reaction are as follows:
-

-

DNA Polymerase I, Large (Klenow) Fragment(M0210S)

KOD DNA Polymerase(Merck Millipore@Novagen, TB320)


Quick Ligation™ Kit (M2200S)
- Set up the following reaction in a microcentrifuge tube on ice. (T7 DNA Ligase should be added last. Note that the table shows a ligation using a molar ratio of 1:3 vector to insert for the indicated DNA sizes.)
- Use NEBiocalculator to calculate molar ratios.

- The Quick Ligase Reaction Buffer should be thawed and resuspended at room temperature.
- Gently mix the reaction by pipetting up and down and microfuge briefly.
- Incubate at room temperature (25°C) for 5 minutes.
- Chill on ice and transform 1-5 µl of the reaction into 50 µl competent cells. Alternatively, Store at -20°C.
- Do not heat inactivate – heat inactivation dramatically reduces transformation efficiency
Premix TaqTM (RR902A)
PCR system


PrimeSTAR Max DNA Polymerase - Clontech(R045Q)


Ultra-Competent cells protocol
‘’’The Inoue Method for Preparation and Transformation of Competent E. Coli: "Ultra-Competent" Cells’’’
‘’’Joseph Sambrook and David W. Russell’’’
This protocol was adapted from Molecular Cloning, 3rd edition, by Joseph Sambrook and David W. Russell. Cold Spring Harbor Laboratory Press, Cold Spring Harbor, NY, USA, 2001
INTRODUCTION
This protocol reproducibly generates competent cultures of E. coli that yield 1 x 10⁸ to 3 x 10⁸ transformed colonies/µg of plasmid DNA. The protocol works optimally when the bacterial culture is grown at 18°C. If a suitable incubator is not available, a standard bacterial shaker can be set up in a 4°C cold room and regulated to 18°C.
MATERIALS
DMSO
Inoue transformation buffer (please see Step 1)
Chilled to 0°C before use.
Plasmid DNA (recombinant plasmid)
-
Construct using one of the methods described ’’’’’ in Directional Cloning into Plasmid Vectors, Attaching Adaptors to Protruding Termini, Blunt-ended Cloning into Plasmid Vectors, Dephosphorylation of Plasmid DNA, Addition of Synthetic Linkers to Blunt-ended DNAand Ligating Plasmid and Target DNAs in Low-melting-temperature Agarose.’’’’’
-
SOB agar plates containing 20 mM MgSO4 and the appropriate antibiotic
SOB medium for initial growth of culture
SOB medium, for growth of culture to be transformed
SOC medium
Approximately 1 ml of this medium is needed for each transformation reaction.
‘’’DMSO’’’
Purchase a high grade of DMSO (dimethylsulfoxide, HPLC grade or better). Divide the contents of a fresh bottle into 1-ml aliquots in sterile tubes. Close the tubes tightly and store at -20°C. Use each aliquot only once and then discard.
‘’’SOB’’’
- NaCl, 0.5 g
- tryptone, 20 g
- deionized H2O, to 950 ml
- For solid medium, please see Media Containing Agar or Agarose.
- yeast extract, 5 g
Shake until the solutes have dissolved. Add 10 ml of a 250 mM solution of KCl. (This solution is made by dissolving 1.86 g of KCl in 100 ml of deionized H2O.) Adjust the pH of the medium to 7.0 with 5 N NaOH (approx. 0.2 ml). Adjust the volume of the solution to 1 liter with deionized H2O. Sterilize by autoclaving for 20 minutes at 15 psi (1.05 kg/cm 2) on liquid cycle. Just before use, add 5 ml of a sterile solution of 2 M MgCl2. (This solution is made by dissolving 19 g of MgCl2 in 90 ml of deionized H2O. Adjust the volume of the solution to 100 ml with deionized H2O and sterilize by autoclaving for 20 minutes at 15 psi [1.05 kg/cm2] on liquid cycle.)
‘’’SOC’’’
- yeast extract, 5 g
- deionized H2O, to 950 ml
- For solid medium, please see Media Containing Agar or Agarose.
- NaCl, 0.5 g
- tryptone, 20 g
SOC medium is identical to SOB medium, except that it contains 20 mM glucose. After the SOB medium has been autoclaved, allow it to cool to 60°C or less. Add 20 ml of a sterile 1 M solution of glucose. (This solution is made by dissolving 18 g of glucose in 90 ml of deionized H2O. After the sugar has dissolved, adjust the volume of the solution to 100 ml with deionized H2O and sterilize by passing it through a 0.22-µm filter.)
METHOD
- Prepare Inoue transformation buffer (chilled to 0°C before use).
- Prepare 0.5 M PIPES (pH 6.7) (piperazine-1,2-bis[2-ethanesulfonic acid]) by dissolving 15.1 g of PIPES in 80 ml of pure H2O (Milli-Q, or equivalent). Adjust the pH of the solution to 6.7 with 5 M KOH, and then add pure H2O to bring the final volume to 100 ml. Sterilize the solution by filtration through a disposable prerinsed Nalgene filter (0.45-µm pore size). Divide into aliquots and store frozen at -20°C.
- Prepare Inoue transformation buffer by dissolving all of the solutes listed below in 800 ml of pure H2O and then add 20 ml of 0.5 M PIPES (pH 6.7). Adjust the volume of the Inoue transformation buffer to 1 liter with pure H2O.

- Sterilize Inoue transformation buffer by filtration through a prerinsed 0.45-µm Nalgene filter. Divide into aliquots and store at -20°C.
- Pick a single bacterial colony (2-3 mm in diameter) from a plate that has been incubated for 16-20 hours at 37°C. Transfer the colony into 25 ml of SOB medium (LB may be used instead) in a 250-ml flask. Incubate the culture for 6-8 hours at 37°C with vigorous shaking (250-300 rpm).
- At about 6 o'clock in the evening, use this starter culture to inoculate three 1-liter flasks, each containing 250 ml of SOB. The first flask receives 10 ml of starter culture, the second receives 4 ml, and the third receives 2 ml. Incubate all three flasks overnight at 18-22°C with moderate shaking.
- The following morning, read the OD600 of all three cultures. Continue to monitor the OD every 45 minutes.
- When the OD600 of one of the cultures reaches 0.55, transfer the culture vessel to an ice-water bath for 10 minutes. Discard the two other cultures.
- Harvest the cells by centrifugation at 2500g (3900 rpm in a Sorvall GSA rotor) for 10minutes at 4°C.
- Pour off the medium and store the open centrifuge bottle on a stack of paper towels for 2 minutes. Use a vacuum aspirator to remove any drops of remaining medium adhering to walls of the centrifuge bottle or trapped in its neck.
- Resuspend the cells gently in 80 ml of ice-cold Inoue transformation buffer.
- Harvest the cells by centrifugation at 2500g (3900 rpm in a Sorvall GSA rotor) fo
10minutes at 4°C.
- Pour off the medium and store the open centrifuge tube on a stack of paper towels for 2 minutes. Use a vacuum aspirator to remove any drops of remaining medium adhering to the walls of the centrifuge tube or trapped in its neck.
- Resuspend the cells gently in 20 ml of ice-cold Inoue transformation buffer.
- Add 1.5 ml of DMSO. Mix the bacterial suspension by swirling and then store it in ice for 10 minutes.
- Working quickly, dispense aliquots of the suspensions into chilled, sterile microcentrifuge tubes. Immediately snap-freeze the competent cells by immersing the tightly closed tubes in a bath of liquid nitrogen. Store the tubes at -70°C until needed.
- When needed, remove a tube of competent cells from the -70°C freezer. Thaw the cells by holding the tube in the palm of the hand. Just as the cells thaw, transfer the tube to an ice bath. Store the cells on ice for 10 minutes.
- Use a chilled, sterile pipette tip to transfer the competent cells to chilled, sterile 17 x 100-mm polypropylene tubes. Store the cells on ice.
- Include all of the appropriate positive and negative controls.
- Add the transforming DNA (up to 25 ng per 50 µl of competent cells) in a volume not exceeding 5% of that of the competent cells. Swirl the tubes gently several times to mix their contents. Set up at least two control tubes for each transformation experiment, including a tube of competent bacteria that receives a known amount of a standard preparation of superhelical plasmid DNA and a tube of cells that receives no plasmid DNA at all. Store the tubes on ice for 30 minutes.
- Transfer the tubes to a rack placed in a preheated 42°C circulating water bath. Store the tubes in the rack for exactly 90 seconds. Do not shake the tubes.
- Rapidly transfer the tubes to an ice bath. Allow the cells to cool for 1-2 minutes.
- Add 800 µl of SOC medium to each tube. Warm the cultures to 37°C in a water bath, and then transfer the tubes to a shaking incubator set at 37°C. Incubate the cultures for 45 minutes to allow the bacteria to recover and to express the antibiotic resistance marker encoded by the plasmid.
- Transfer the appropriate volume (up to 200 µl per 90-mm plate) of transformed competent cells onto agar SOB medium containing 20 mM MgSO4 and the appropriate antibiotic.
- Store the plates at room temperature until the liquid has been absorbed.
- Invert the plates and incubate them at 37°C. Transformed colonies should appear in 12-16 hours.
REFERENCES
- Inoue, H., Nojima, H., and Okayama, H. 1990. High efficiency transformation of Escherichia coli with plasmids. Gene 96: 23–28.
---