Team:Tuebingen/CloneWars

Motivation & Idea
Doing the iGEM lab work, cloning some stuff with 3A assembly. Hasn’t everyone wished you could just take your parts, cut the plasmids, mix and ligate them and be done with it? No need for time intensive (and expensive!) purification of the cut plasmids.
We designed a system that will allow you to do exactly that. The idea is very simple: If we would combine this with parts in the normal iGEM plasmids, we’d get re-ligation products of the original plasmids as well as possible side products (see figure 1). How can we get rid of all of these in one simple step?

Quite easily, since the common feature of all the undesired ligation products is that they have (at least) one backbone of the two plasmids, which were source for the parts we want to fuse together. If we put a negative selection marker into the backbone of these plasmids, we can easily get rid of them - not during the ligation, but directly after the transformation.
This method will of course reduce the effective transformation efficiency, because only one out of 10 or more ligations products is desired and able to form a colony after transformation. However, we can easily put a lot more DNA into the ligation reaction, since we can use the whole restriction mixture.
And if we are already improving cloning techniques, why stop at restriction and ligation? Can we not also make plasmid purification easier, which is quite expensive - especially for small iGEM teams with little funding - and also complicated to do using pipetting robots.
How could a one-step purification of only (desired) plasmids from the lysate of bacteria work? We’d need something, that can bind plasmid-DNA, but does not bind genomic DNA. This can only be achieved through a sequence specific binding, so we’ll have to use nature’s toolkit for this.
There are a lot of very specific DNA binding proteins out there, for example the zinc-finger proteins, which are already well characterised from their use in zinc-finger-nucleases. However, proteins are not very stable and putting them directly on a column is - while obviously possible - pretty much the opposite of what makes an method easy to use or cheap.
So how can we use proteins to bind plasmids, without having them prepared? Well - as always, we could say - our friends the bacteria can help us. If we already need to design a plasmid with a specific binding sequence in it, why not make that plasmid express a protein, that directly binds it? That way we only need a way bind our protein of interest with a specific tag. For strong binding and maximum efficiency we can use biotin and fuse our DNA-binding protein with streptavidin.
The combination of 3D printing and some good old chemistry gives us the possibility to create our own columns with a biotinylated surface, that should be able to pull our plasmids from E. coli lysates.
Design
The idea is simple: by integrating an inducible kill gene into the backbone, we can specifically select for our desired combination.
Using different inducers and kill switches, which can be found in the registry by loads, we can create a series of plasmids which can also be combined to bring more than one plasmid into the same culture of bacteria.
Kill cassettes
The first idea which comes to mind when thinking about kill switches is the combination of Holin and Endolysin (Young, 2002), which was already used by several iGEM teams. However, other proteins such as PezT (pneumococcal epsilon-zeta toxin, Mutschler et al., 2011) , part of a prokaryotic toxin/antitoxin system, were already used in iGEM as well, e.g. by Team Hamburg in 2015. PezT is smaller than Holin, which makes it easier to integrate into the plasmids, and also makes it easier to transform. We decided to look at both variants.
Looking at different induction systems, we chose three well-known systems: the LacI and LacZ cassettes, as well as a rhamnose-inducible promoter and the TetR (tet-on) system (Chan et al., 2015).
Combination of the inducers with the kill genes and introduction of restrictions sites which would allow us to integrate the cassettes into backbones without interfering with the RFC standards (see below) gives rise to three different cassettes:
- Apa-pRha + RBS-PezT + Terminator-Bam-Hind
- Apa-const-Promoter + LacI cassette + LacI promoter + RBS-PezT + Terminator-Bam-Hind
- Apa-const-Promoter + TetR casette + TetR promoter + RBS-PezT + Terminator-Bam-Hind

Plasmid Purification
As described below, the plasmid purification depends on zinc-fingers which bind to special sequences on the DNA. By using fusion proteins of zinc fingers with streptavidin, we can pull out the desired plasmid bound to the zinc finger on biotin-covered surfaces.
We selected three zinc fingers which are reported to bind strongly to their respective binding sequences.
We decided to use the following zinc finger proteins to bind our plasmids, since they were reported to work well and have a strong binding affinity:
- C7C7 (source: mouse transcription factor, Liu et al., 1997)
- K230R (source: de-novo design against human CCR2 / CCr7, Lee et al., 2010)
- ZFN-L (source: de-novo design against human CCR5, paper: Lombardo et al., 2007)
We integrated the respective binding site for each zinc-finger-streptavidin fusion protein (from now on referred to only as zinc-finger) behind the promoter of the respective zinc-finger, so that binding of the protein will partially inhibit its own transcription. This will prevent over-production of the zinc-fingers in the bacterium, as we only need as many copies of the protein as there are the plasmids that contain them.
Integration into Plasmid Backbone
Starting from the standard iGEM plasmids (pSB1C3, pSB1A3), we need to introduce restriction sites into a non-coding, non-regulating sequence in the backbone that will allow us to clone our finished constructs (possibly one of each kind) into the backbone. Since we want to create RFC compatible plasmids, we have to use non-RFC restriction enzymes for that.
We decided to use ApaI, BamHI and HindIII for this, as they are easily available to us. To find the best possible positions for the insertion of new restriction sites, we used a python script (see here). This allowed us to find the position in the backbone where the lowest number of mutations would be necessary for any combination of two of the three enzymes in all non-annotated (as analysed by SnapGene, see fig. 3) sequences in both plasmids. The sequence we selected for mutation is located between replication origin and the antibiotic resistance gene. The wild type sequence GGGGTCtgACGCTC can be mutated to the target sequence GGGCCCtgAAGCTT by changing the for bases marked in the oiriginal sequence. Thereby the restriction sites for ApaI and HindIII are introduced. This allows us now to insert any combination of a negative selection cassette and plasmid purification cassette into the mutated backbones, that have the additional restriction sites.

(References are listed here)
Results
We tested three different 3D printer materials concerning their stability in solvents which could be used during the linking reaction of biotin to a 3D-printed microchip. After two hours incubation of the materials in the solvents, we observed that all the materials were either completely dissolved or were very soft to the touch (see fig. 4). Since we could not leave out piperidin in the coupling reaction, we had to re-think on better alternatives for coupling our biotin. The Intavis AG in Tuebingen helped us out by giving us a derivatized cellulose membrane, originally used for their SPOT synthesis, which stay stable during the coupling process. Sadly, due to time problems, we could not test the coupling of biotin to the membrane.

Construction of the zinc fingers
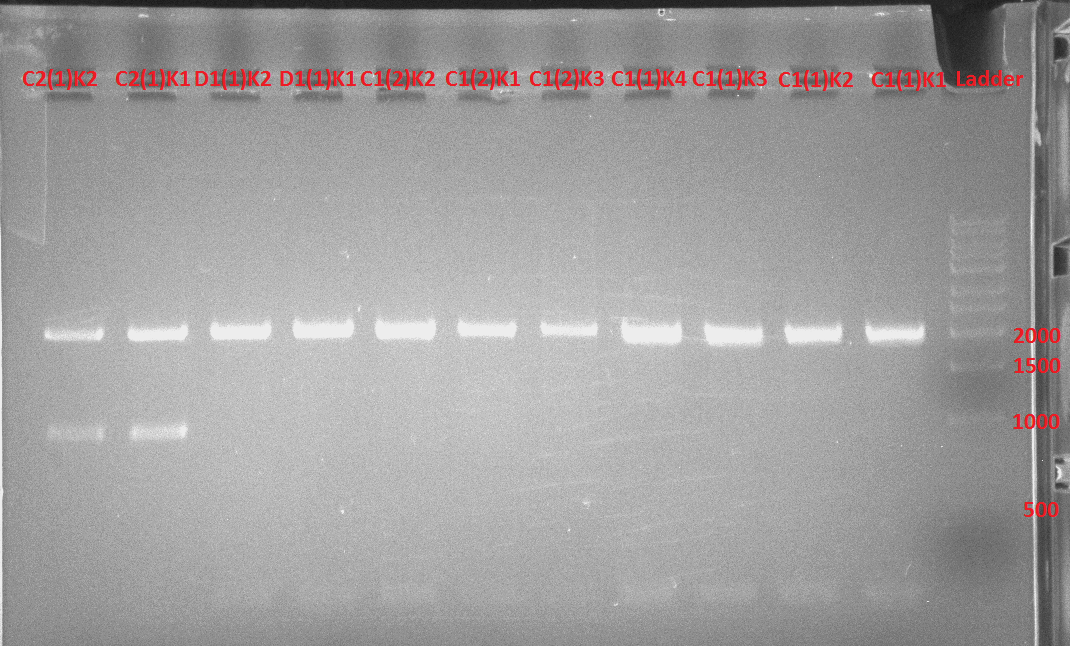
Unfortunately, due to a contamination with a second plasmid we were unable to ligate our zinc finger constructs correctly. While our zinc finger constructs are only about 400-500 base pairs long and our promoter inserts are 50-100 base pairs long adding up to a maximum of 600 bp, the band after restriction of our parts from the vector showed 1500 bp. The bands at about 2100 bp represent the backbone of the pSB1C3 plasmid while the bigger bands represent the linearised plasmids (see fig. 5).

Because of time restraints we decided to directly ligate the promoters with the respective zinc finger and to amplify the ligated products via PCR. We used VR2 and VF2 primer (as indicated by SnapGene) for the pSB1C3 backbone which added about 300bp more to our products. However, the PCR amplicons were too small to be our products and we had stop cloning our zinc finger constructs as the giant jamboree advanced rapidly.
Construction of the Kill cassettes
When we tried to ligate Apa-pRha and Kill1 (BBa_K1882009 + BBa_K1882015 ), we were unable to ligate our Kill1 Part into a plasmid containing the L-rhamnose-inducible promoter. None of the analyzed clones showed an insertion of the Kill1 Part.
We had similar problems in the synthesis of our Apa-const-Promoter + LacI cassette + LacI promotor + RBS-PezT + Terminator-Bam-Hind construct. When we analysed the insert, it revealed to be only about 1000 bp but it was expected to be 2500bp. Unfortunately we had not enough time to repeat the necessary construction steps. While we could not detect the right inserts, we could detect the 2100 bp long backbone of the pSB1C3 plasmids (see figure 6).
When we tried to construct Apa-const-Promoter + TetR cassette + TetR promoter + RBS-PezT + Terminator-Bam-Hind, we had severe problems to isolate the right fragment size of the TetR Cassette (BBa_P0440) and the TetR Promoter (BBa_R0040).
We first used the BBa_P0440 and BBa_R0040 parts from the distribution kit of 2016 which are in the pSB1C3 plasmid. While the part TetR cassette should only have 57 bp long fragment we could clearly see a band larger than 500 bp. We therefore transformed the BBa_R0040 part from the distribution kit of 2015 but reproduced the same results (see figure 7).
BBa_P0440 should be detected as a 866 bp long fragment but showed no other band as the one of the Backbone. When we used the BBa_P0440 part of 2015 we had again the same results. Therefore we decided to amplify the BBa_P0440 and BBa_R0040 part of 2016 in the pSB1A2 vector via PCR and used the suggested VR2 and VF2 sequencing primer. This provided us with correct PCR Products.

We purified the PCR products of BBa_P0440 and BBa_R0040 from the gel and ligated them. The ligation product was afterwards amplified via PCR using specific primers which bind the biobrick suffix and prefix. Again, the amplified products were too small and we had no further time to repeat the ligation steps.