Difference between revisions of "Team:Cambridge-JIC/Human Practices"
| Line 65: | Line 65: | ||
<p>The event follows the philosophy of Night Science from the French biologist François Jacob, winner of the 1965 Nobel Prize for Medicine for his joint discovery of transcriptional regulation of enzyme level expression by the lac operon in E.coli. He proposed the concept of Night Science in his 1988 memoir “The Statue Within”, writing:</p> | <p>The event follows the philosophy of Night Science from the French biologist François Jacob, winner of the 1965 Nobel Prize for Medicine for his joint discovery of transcriptional regulation of enzyme level expression by the lac operon in E.coli. He proposed the concept of Night Science in his 1988 memoir “The Statue Within”, writing:</p> | ||
| − | <center><p style="font-family:Arvo;font-size:150%; | + | <center><p style="font-family:Arvo;font-size:150%; font-weight:bold; width:80%">“Science has in fact two aspects. Day science involves reasoning as articulated as gears, results that have the strength of certainty… |
<br> | <br> | ||
Night Science, on the contrary, wanders in the dark. It hesitates, stumbles, falls. Questioning everything... Nothing guarantees its successes, its ability to survive the tests of logic and experiments, but sometimes thanks to intuition, instinct and the will to discover, as a lightning it illuminates more than a thousand suns…”.</p> | Night Science, on the contrary, wanders in the dark. It hesitates, stumbles, falls. Questioning everything... Nothing guarantees its successes, its ability to survive the tests of logic and experiments, but sometimes thanks to intuition, instinct and the will to discover, as a lightning it illuminates more than a thousand suns…”.</p> | ||
Revision as of 16:26, 6 October 2016

HUMAN PRACTICES
DIY Bio-Commmunity

On the weekend that English ferry ports ground to a halt, and travellers faced 14-hour delays, members of the iGEM Cambridge-JIC team defied these odds to reach Paris in the name of science. Rather, in the name of NightScience, an annual conference hosted by the CRI (Center de Recherches Interdisciplinaires) at the Cité des Sciences et de l’Industries which brought together synthetic biologists and innovative thinkers from around the world for two days of fascinating talks and workshops.
The event follows the philosophy of Night Science from the French biologist François Jacob, winner of the 1965 Nobel Prize for Medicine for his joint discovery of transcriptional regulation of enzyme level expression by the lac operon in E.coli. He proposed the concept of Night Science in his 1988 memoir “The Statue Within”, writing:
“Science has in fact two aspects. Day science involves reasoning as articulated as gears, results that have the strength of certainty…
Night Science, on the contrary, wanders in the dark. It hesitates, stumbles, falls. Questioning everything... Nothing guarantees its successes, its ability to survive the tests of logic and experiments, but sometimes thanks to intuition, instinct and the will to discover, as a lightning it illuminates more than a thousand suns…”.
Given the opportunity to present our project at the conference along with this year’s Paris Bettencourt iGEM team, the resonance of this idea with the iGEM philosophy and experimental process was clear (though we can only hope our project “illuminates” the plant science community with the light of at least a few suns). It also applied to the projects of many participants we met during the conference from interdisciplinary labs, such as the CRI and the Waag Society in Amsterdam, and the Bio Makespace community.
We were inspired by the DIY hacking culture of this community and wanted to lend our support through the engineering side of our project. By developing low-cost open source hardware for the transformation and growth of plant tissue samples, we hope to equip the DIY Bio community with the tools it needs to increase the use of plant chassis. Attracting people from a diverse range of backgrounds, the Makespace community is a promising way to improve the interaction of non-scientists with the field of plant synthetic biology.
Since our return to Cambridge, we have continued the design of a growth facility and gene gun. Several of our team members are also in the process of establishing Cambridge’s first Bio Makespace, which we hope to support as a team with the hardware we are developing and outreach activities later this summer.
Promoting Homoplasmy
The ultimate goal of the project is to achieve homoplasmy in Chlamydomonas chloroplasts much more quickly than the 2-3 months of repeated antibiotic selection currently taken — ideally, over the span of a single generation.
Our method relies on double transformation of Chlamydomonas chloroplast with a cassette-of-interest (CoI) and the highly customisable “driver” cassette that we are developing. The “driver” could be easily adapted to any cassette-of-interest by changing the 20 nucleotide gRNA space (plus, if needed, homology regions 1 and 2). The organisation of the two cassettes is shown in the figure below:
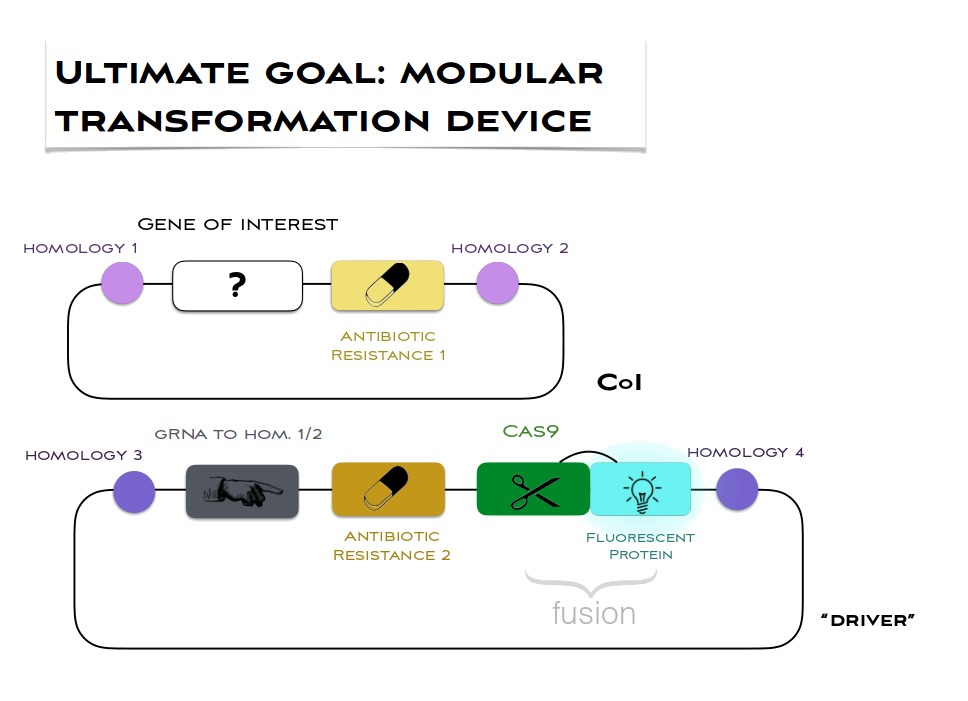
After transformation, Cas9 would repeatedly cut chloroplast genome copies at the desired site of insertion, thereby promoting homologous recombination (HR). The cutting would continue until the gRNA homology in all of genome copies has been disrupted, which can only result when the cassette-of-interest is used as the template for HR. Non-homologous end-joining does not occur in chloroplasts, and so would not interfere. By the end of the process, all genome copies would have the cassette-of-interest, i.e. homoplasmy would be achieved.
We are taking safety considerations very seriously. The “driver” cassette would not promote its own propagation, as Cas9 would only cut the genome between homologies 1 and 2. This means that the transformed algae would not pose any danger, even if accidentally released into the environment. Moreover, it may be possible (although further testing is still needing to confirm this) to get rid of the Cas9 gene altogether, by replating the cells onto antibiotic 1 only, once homoplasmy is confirmed. This would remove the selection pressure for the “driver”, which might then be lost.
A library of chloroplast parts in PhytoBrick standard
We are also developing a library of chloroplast genetic components, compatible with the recently developed and highly modular PhytoBrick standard for the assembly of gene units. We have codon-optimised many of our parts (using the software developed by Saul Purton at UCL), and are checking their functionality. Limited by the 10-week duration of the iGEM project, we are unlikely to complete all the necessary experiments to verify our Cas9 strategy, but the library would also have a standalone value and enable future work in this area.
HARDWARE
We are developing open-source hardware which could come at a fraction of the cost of commercially available equivalents, extensively documenting assembly protocols online to make them accessible to researchers with little or no electronic and mechanical experience. All documentation will include comprehensive part names and wiring diagrams. We are also in the process of uploading video tutorials to Instructables / Youtube
Biolistic Device (“gene gun”)
One of the project aims is to design, build and document a full protocol for a low-cost gene gun. Biolistics is a particle bombardment technique widely used in a range of cell/tissue type transformations, capable of rapid delivery of multiple plasmids for transient or stable expression and without the use of carrier DNA. The high-velocity microparticles can penetrate plant cell walls, enabling transformation of plastids such as the chloroplast, which we will use in our project.
As useful as this technique is, the cost of commercially-available biolistic systems can run into the tens of thousands of pounds, making them unattainable for smaller laboratories and the hobbyist Syn Bio community. Our design will feature similar functions to these systems, allowing optimisation of firing pressure, duration and distance from the target, but for just 1% of their cost. The gene gun will be designed to use lower-cost consumable options, such as easily-replaceable CO2 cartridges.
The design will also incorporate safety features for the user, which are generally neglected in existing DIY designs available online. (1) It operates at 140 psi, while most similar designs online use 600-700 psi, and most commercial ones around 1350 psi, (2) all electronics are contained inside a box, so no electrical connections are exposed, (3) additional circuit fuses are included and are specifically rated for the current going through, (4) all components are tested separately for leaks and electrical safety.
Growth facility
Within the field of synthetic biology, there has recently been a necessity for low-cost, DIY, biological lab equipment in order to maintain the momentum at which the field is developing. Our iGEM team has two solutions to this problem, one of which is the growth chamber. Our team’s growth chamber allows you to optimise the conditions and to record and analyse the growth of your 90 mm petri dishes at a fraction of the cost of the commercially available equivalents, regardless of the samples you're growing
Hardware Specification
Gene Gun
- Total cost <£250 (1% of PDS-1000 retail price) – the final cost will be close to £228.05, with just the safety shield for the gun left to assemble.
- Generate pressure pulse of at least 100 psi
- Adjustable pulse pressure – maximum pressure of 10 bar.
- Adjustable pulse duration – minimum pulse of 50 ms, adjustable in 10 ms increments.
- Display pressure of firing pulse.
- Contain all electrical connections and wiring within an insulated box, ensuring there are no exposed electrical connections to pose risk to the user.
- Easily adjustable distance of gene gun from target plate.
- Provide measurement of distance from target plate using an adjacently-clamped ruler.
- Suspend carrier particles on a parafilm membrane which ruptures at the target pressure.
- Removable macrocarrier to hold the microparticles and membrane.
- Mesh filter in gun nozzle to prevent ruptured parafilm being fired into the target.
- Easily-replaceable supply of CO2, using generic threaded 16g CO2 cartridges
- Manual firing switch away from the actual gun, for safer firing.
- Successfully transform plant cell target at the low pressure levels generated by the gun, relative to commercial gene guns.
- Safety screen around gun to shield user from ruptured membrane debris. This will fit over the electronics box and gun trigger when stored, so the user must consciously handle the safety screen before firing the gun and will thus be reminded to use this safety feature.
- Base to provide stability for the gun and petri dishes of different sizes.
- Easy to surface sterilise the gun and base for use in sterile fume hood.
- The gun is mounted on a clamp stand and wooden base, with all the electronics contained inside the box on the left (the gun would go inside the sterile fume hood and the box could be left on the bench outside). The stand height has been reduced to 0.4m so it can fit inside any standard sterile hood.
- The final prototype will also include a ruler clamped alongside the gun to measure distance to the target plate on firing.
- The wires connecting the box to the gun are 0.6m long, to allow the electronics to remain contained and outside of the sterile hood during transformations (reducing the risk of liquid disinfectant being sprayed on any electrical connections).


We plan to test the gun in early September by transforming onion bulb cells with a GFP or GUS reporter system, experimenting with optimisation of the firing pressure for the gun and documenting penetration of the cell target qualitatively.
The connections in the gun are all currently being pressure tested under water and sealed using PTFE tape, to ensure the gun is safe for repeated use.

General layout of the gene gun
Growth Facility
Design Aims
- 10 high-power LEDs (up to around 2 Watts each), with 2 each of 5 different colours (red, true green, blue, ultra-white 6000K, and infrared 850nm) that can be programmed in circadian rhythms, allowing you to choose the wavelength and the intensity of light that is best for your samples
- A “Peltier” element for temperature control
- A camera module controlled by a Raspberry Pi which autonomously takes pictures of your samples at pre-scheduled intervals and uploads them online, allowing you to view the progress of your samples from anywhere with an internet connection (and also to produce time-lapses)
- A thermistor and LDR for measurement and analysis of temperature and light conditions throughout growth (the growth chamber produces tables of this information which can be imported into Excel), as well as for feedback to the “Peltier” element
- Fans for controlling air circulation in the growth chamber, and for cooling electronic components
- Improve efficiency of Peltier element by adding extra fan to remove air from the “hot side”
- Add H-bridge, allowing the Peltier to be controlled as both a heater and a cooler
- Acquire a higher-power Peltier element
- Improve organisation of wiring
Power Supplies
It was originally intended to house both the 5V power supply and the 700mA LED driver within the electronics enclosure, however, due to Jake's hastiness with soldering, Jake accidentally soldered the LED driver to the mains cable before putting the mains cable through the hole for external cabling, so that the LED driver now doesn’t fit through the hole. Hence Jake decided to keep the power supplies outside of the box. Jake will resolve this issue for the future by modifying the CAD files so that the hole meets the top of the box.
The design of this growth facility is currently being documented, and will be published in a full tutorial on Instructables and our wiki, with the intention that anyone who wants to will be able to find the tutorial and follow it without difficulty, regardless of experience.
Extendibility
This growth chamber houses 1 petri dish. The reason I made this design decision was that housing multiple petri dishes in the same growth chamber would have resulted in inconsistent conditions in temperature and lighting (and larger material costs), whereas having multiple chambers joined together wouldn’t have had any obvious advantages over building several separate units, in order to justify the extra material costs and effort required under the time pressure.
If one wanted to house several petri dishes, the options would be to either build separate units, or to modify the CAD files and acquire extra components (the CAD files will be uploaded to the wiki and Instructables along with the tutorial) in order to house the extra petri dishes.
Possible improvements
Main View

Inside View

Electronic Enclosure

Power Supplies