Notebook - Protocols
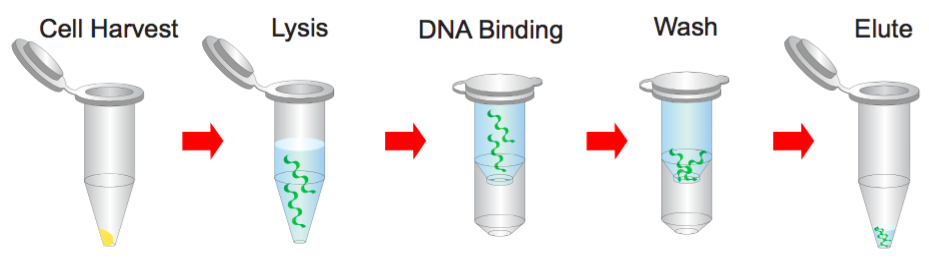
Plasmid miniPREP Kit Protocol
Step 1 Bacterial Cells Harvesting
1. Transferred 1.5 ml bacterial culture to a microcentrifuge tube.
2. Centrifuged at 14,000 x g for 1 minute and discard the supernatant.
Step 2 Resuspend
1. Resuspended pellete of bacterial cells in 200 μl of the Buffer S1 (RNase A added).
Step 3 Lysis
1. Added 200 μl of the Buffer S2 and mixed thoroughly by inverting the tube 10 times (do not vortex) and then standed at the room temperature for 2 minutes or until the lysate is homologous.
Step 4 Neutralization
1. Added 300 μl of the Buffer S3 and mixed immediately and thoroughly by inverting the tube 10 times (Do not vortex).
2. Centrifuged at 14,000 x g for 3 minutes.
Step 5 Binding
1. Placed a PM column in a Collection Tube. Applied the supernatant (from step 4) to the PM column by decanting or pipetting.
2. Centrifuged at 14,000 x g for 30 seconds, then discarded the flow-through, and placed the PM column back into the same col/lection tube.
Step 6 Wash
1. Added 400 μl of the Buffer W1 into the PM column.
2. Centrifuged at 14,000 x g for 30 seconds.
3. Discarded the flow-through and place the PM column back into the same collection tube.
4. Added 600 μl of the Buffer W2 (Ethanol added) into the PM column.
5. Centrifuged at 14,000 x g for 30 seconds.
6. Discarded the flow-through and place the PM column back into the same collection tube.
7. Centrifuged at 14,000 x g again for 2 minutes to remove the residual Buffer W2.
Step 7 Elution
1. To elute DNA, placed the PM column in a clean 1.5 ml microcentrifuge tube.
Added 50~200 μ l of the Buffer E or H2O (pH between 7.0 and 8.5) to the center of each PM column. After standing for 2 minutes, it centrifuged at 14,000 x g for 2 minutes.
NOTE: Check the buffers before use for salt precipitation. Redissolve any precipitate by warming to 37°C.
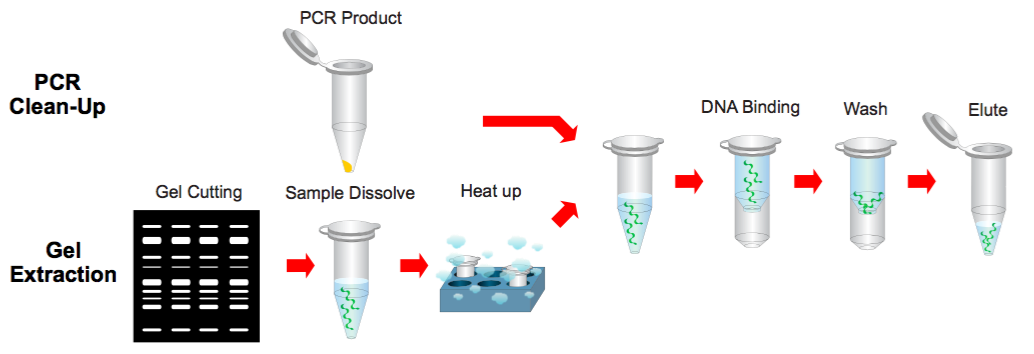
PCR Clean-Up & Gel Extraction Protocol
Step 1 Sample Preparation
PCR Cleanup
1. Added 500 μl of the Buffer B to 100 μl of the PCR product and mix by vortex.
Gel Extraction
1. Excised the DNA fragment from the agarose gel.
2. Transferred up to 300 mg of the gel slice to a 1.5 ml microcentrifuge tube.
3. Added 500 μl of the Buffer B to the sample and mixed by vortex. Incubate at 60°C for 10 minutes (or until the gel slice has completely dissolved).
4. During the incubation, mixed by vortexing the tube every 2~3 minutes.
5. Cooled the dissolved sample mixture to the room temperature.
Step 2 Binding
1. Placed a PG Column in a Collection Tube. Apply the supernatant (from step 1) to the PG Column by decanting or pipetting.
2. Centrifuged at 14,000 x g for 30 seconds.
3. Discarded the flow-through and place the PG Column back into the same collection tube.
* The maximum volume of the PG Column reservoir is 800 μl. If the sample mixture is higher than 800 μl, it would repeat the DNA binding Step.
Step 3 Wash
1. Added 400 μl of the Buffer W1 into the PG Column.
2. Centrifuged at 14,000 x g for 30 seconds.
3. Discarded the flow-through and place the PG Column back into the same collection tube.
4. Added 600 μl of the Buffer W2 (ethanol added) into the PG Column.
5. Centrifuged at 14,000 x g for 30 seconds.
6. Discarded the flow-through and place the PG Column back into the same collection tube.
7. Centrifuged at 14,000 x g again for 2 minutes to remove the residual Buffer W2.
Step 4 Elution
1. To elute the DNA, placed the PG Column in a clean 1.5 ml microcentrifuge tube.
2. Added 50-200 μl of the Buffer E or H2O (pH is between 7.0 and 8.5) to the center of each PG Column, let it stand for 2 minutes, and centrifuge at 14,000 x g for 2 min.
NOTE: Check the buffers before the use for salt precipitation. Redissolve any precipitate by warming to 37°C.
Plasmid Construct Protocol
STEP 1: Digest plasmid (for vector) with appropriate restriction enzymes.
| Plasmid |
200 ng |
1000 ng |
| EcoRI-HF (SpeI-HF) |
0.2 μl |
1 μl |
| XbaI (Pst-HF) |
0.2 μl |
1 μl |
| CutSmart Buffer |
2 μl |
5 μl |
| ddH2O |
Up to 20 μl |
Up to 50 μl |
| Total |
20 μl |
50 μl |
Digest at 37 degree for 1 hr.
STEP 2: Digest plasmid (for insert) with appropriate restriction enzymes.
| Plasmid |
200 ng |
1000 ng |
| EcoRI-HF (XbaI) |
0.2 μl |
1 μl |
| SpeI-HF (Pst-HF) |
0.2 μl |
1 μl |
| CutSmart Buffer |
2 μl |
5 μl |
| ddH2O |
Up to 20 μl |
Up to 50 μl |
| Total |
20 μl |
50 μl |
Digest at 37 degree for 1 hr.
Do gel electrophoresis to confirm the size of the digested product.
Do gel purification of the target size.
Ligation: Gently mix the following reaction by pipetting up and down and centrifuge briefly.
| Vector (4 kb) |
25 ng (0.010 pmol) |
| Insert (1 kb) |
19 ng (0.030 pmol) |
| T4 DNA Ligase Buffer (10X) |
1 μl |
| T4 DNA Ligase |
0.5 μl |
| ddH2O |
Up to 10 μl |
| Total |
10 μl |
T4 DNA Ligase should be added last.
The molar ratio of vector to insert varies from 1:3 to 1:10 depending on the DNA sizes.
STEP 6: Incubate at 16°C for 4-6 hours or overnight.
STEP 7: Transform the product by heat shock.
TA cloning Protocol
We used TA cloning to amplify the PCR product or g-block product. In this procedure, PCR products are usually amplified by Taq DNA polymerase which preferentially adds an adenine to the 3' end of the product. Except the multiple cloning sites, the T-vector and pUC19 vector share the same features. Although the multiple cloning sites in lacZ gene are replaced, it also can expressβ-galactosidase.
Therefore, we can use blue-white selection to select positive clones.
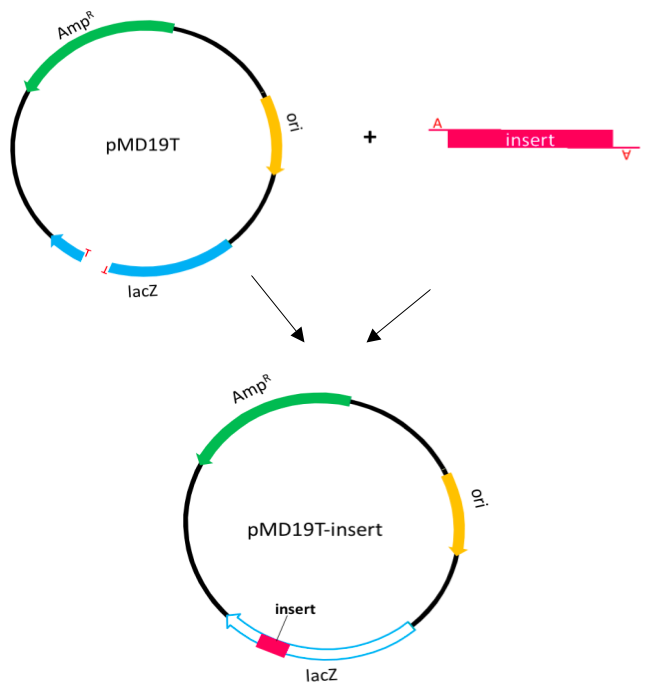
STEP 1: Add the following reactants into the microcentrifuge tube.
| T-Vector pMD19T(Simple) |
1 μl |
| PCR product or Control Insert |
1 μl |
| ddH2O |
3 μl |
STEP 2: Added 5 ml DNA Ligation Kit and mixed the mixture gently.
STEP 3: Reacted at 16 degree for 2-4 hours.
STEP 4: Transferred all of the mixture to 100 ml DH5a competent cell and put it on the ice for 30 minutes.
STEP 5: Incubated the cell at 42 degree for 90 seconds and transferred it onto ice immediately.
STEP 6: Added 400 ml LB into the tube and grew in a shaker for 1 hour.
STEP 7: Spread 200 ml cell on the agar plate with X-gal, IPTG and Ampicillin.
STEP 8: Grew it overnight at 37 degree.
STEP 9: Confirmed by the colony PCR (use primer M13F and M13R).
PCR Protocol
STEP 1: Gently mix the following reaction by pipetting up and down and centrifuge briefly.
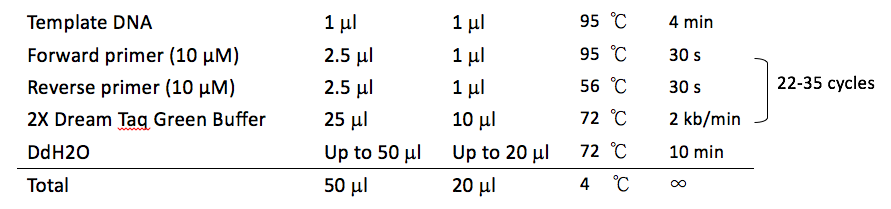
STEP 2: Do gel electrophoresis to confirm the size of the pcr product.
Competent Cell Protocol
The making of DH5α and BL21 competent bacteria
1. Streak out wild type bugs on a plate (LB plate without antibiotics) overnight and pick one colony into 3 ml of media (LB or SOB) and grow overnight.
2. Transfer 0.2 ml of starter culture into 10 ml of fresh LB with 10 mM MgCl2 the next day and grow culture at 37 ℃.
3. When the OD600 up to 0.4-0.6, put the cells on ice immediately.
4. Spin the cells at 4℃ for 10 minutes at 3000 rpm.
5. Suspend the pellet on ice carefully with 4 ml chilly TB buffer
6. Leave nicely suspended bugs on ice for 10 minutes.
7. Spin the cells at 4℃ for 10 min at 3000 rpm.
8. Suspend the pellet on ice with 0.8 ml of TB buffer.
9. Add 0.06 ml DMSO, and mix it gently.
10. Aliquot 100 μl into 1.5 ml centrifuge tubes and snap freeze immediately with liquid nitrogen.
11. Store the frozen cells in the -70°C freezer.
Transformation Buffer (TB)
PIPES (MW :302.4) 10 mM
CaCl2•2H2O (MW :147.02) 15 mM
KCl (MW :74.55) 250 mM
Adjust pH to 6.7 by KOH.
Then add MnCl2•4H2O (MW 197.9) to final concentration 55 mM.
Filter the buffer and store at 4℃. Do not autoclave.
Reference
[1] Plasmid miniPREP Kit (Genedirex)
[2] PCR Clean-Up & Gel Extraction Protocol (Genedirex)
[3] Plasmid Construct Protocol (NEB)
[4] TA Cloning Protocol (Takara)