Protocols
PCR
Primer Design
The software we used to design primers are: SnapGene, VectorNTI, PrimerPremier5.0 and NCBI primer blast. Except for the NCBI primer blast, which is completely automatic, the general consideration for designing primers could be:
- The length of primers should be limited between 18~60bp.
- GC% should be at around 40%~60%.
- False priming, hairpin structure and cross dimers should not appear, if they appear, make sure they wouldn’t impact the PCR efficiency badly.
- If there are some extra bases at the 5’ end of the primers, the annealing temperature of the sequence pairing with the template should be 57-60℃
The primers are synthesized by GENEray. After the arriving of the primers, perform a quick spin with 13000 rpm, 1 min and then dissolve the DNA powder using ddH2O in the given volume.
PCR Using KOD-Plus-Neo from TOYOBO (KOD-401)
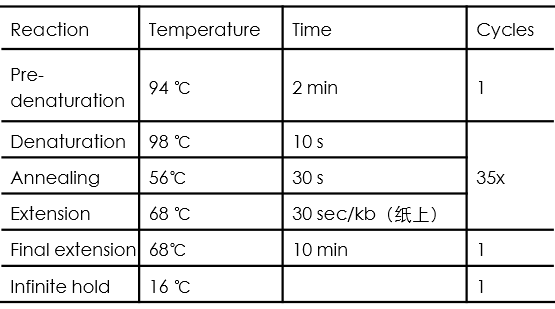
KOD-Plus-Neo is a DNA polymerase with high fidelity and efficiency, our team use it in the amplification of functional element from genomic DNA or commercial plasmids, the typical PCR reaction setup is as follows:

The volume of template DNA and PCR grade water should be determined based on the rule that: X + Y = 34
PCR cycle conditions are as follows:
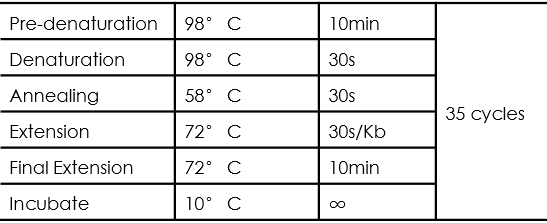
PCR Using Taq DNA polymerase from LifeFeng (Taq DNA polymerase-PT101)
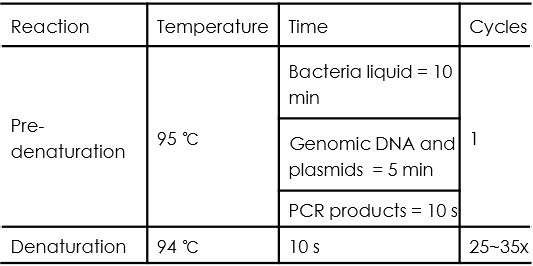
Taq DNA polymerase has the extension speed of 1-2kb/min, and the reliable extension length is 3-5kb, our team used in colony PCR, the typical PCR reaction setup is as follows:
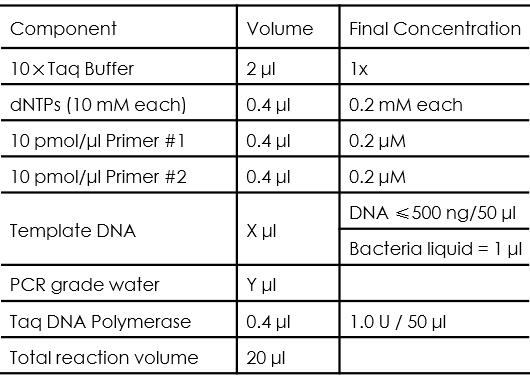
Users should be noticed that all of the liquids should be mixed well after melting down, and the volume of template DNA and PCR grade water should be determined based on the rule that: X + Y = 13.6 .
PCR cycle conditions are as follows:

Yeast Colony PCR
- The single colonies were picked and streaked on a new auxotrophic agar plate, and incubated at 30° C for 2 days until new yeast colonies appear on the plate.
- The PCR reaction mixture is prepared as the following:
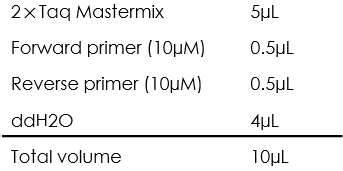
- The colonies were picked and mixed with the PCR reaction mixture.
- PCR amplification procedure:
- The desired DNA fragments were identified by electrophoresis and UV imaging.
Agarose Gel Electrophoresis
- Weight the appropriate amount of agarose powder. Usually,1.0% gel for separating DNA fragments that between 200bp~7000bp, 2.0% gel for fragments between 100bp~200bp, and 2.5% gel for fragments that under 100bp.
- Dissolve the agarose powder in TBE solution buffer by heating it in microwave oven until no solid material can be seen, and no boiling phenomenon should be observed.
- Add ethidium bromide solution (5μl/100ml) after the agarose solution cooling down.
- Place the comb into the gel mold. Apply the agarose solution to the mold and wait for 30mins to get the solid agarose gel. Attention: being exposed under light for too long can cause the degradation of EB. So put the ready-made gels into a box with TBE solution buffer as storage.
- Mix the DNA sample with 6× loading buffer. If the reaction buffer already contains loading buffer, this step can be omitted.
- Load the DNA sample and appropriate DNA ladder to the gel. Set voltage (130~160V) and time(30~45mins).
- Check the result and capture the figure in UV box.
Nucleotides Purification
We used E.Z.N.A. Cycle-Pure Kit from Omega (D6493-01) to perform purification for PCR product or enzyme digested product. Here we just post the manual without an advice:
- Transfer the sample into a clean 1.5 mL microcentrifuge tube.
- Add 4-5 volumes CP Buffer. For PCR products smaller than 200 bp, add 5 volumes CP Buffer and 0.4 V 100 % Isopropanol
- Vortex to mix thoroughly. Brie y centrifuge to collect any drops from the inside of the lid.
- Insert a HiBind® DNA Mini Column into a 2 mL Collection Tube (provided).
- Add the sample from Step 5 to the HiBind® DNA Mini Column.
- Centrifuge at maximum speed (≥13,000 x g) for 1 minute at room temperature.
- Discard the filtrate and reuse collection tube. Add 700 μL DNA Wash Buffer.
- Centrifuge at maximum speed for 1 minute.
Note: DNA Wash Bu er must be diluted with ethanol before use. Please see the Preparing Reagents section on Page 4 for instructions. - Discard the filtrate and reuse collection tube.
- Repeat Steps 10-12 for a second DNA Wash Buffer wash step.
- Centrifuge the empty HiBind® DNA Mini Column at maximum speed for 2 minutes to dry the column.
Note: This step is critical for removal of trace ethanol that may interfere with downstream applications. - Transfer the HiBind® DNA Mini Column into a clean 1.5 mL microcentrifuge tube (not provided).
- Add 30-50 μL Elution Buffer, TE Buffer, or sterile deionized water directly to the center of column matrix.
- Let sit at room temperature for 2 minutes.
- Centrifuge at maximum speed for 1 minute.
Note: This represents approximately 80-90% of bound DNA. An optional second elution will yield any residual DNA, though at a lower concentration. - Store DNA at -20°C. Advice: In step 13, the liquid used to dissolve the DNA should be heated to around 55℃ if the room temperature is rather low, like below 10℃.
Gel Recovery
We used E.Z.N.A. Gel Extraction Kit from Omega(D2500-01) to recover the DNA from agarose gel. Here we just post the manual:
- Perform the gel electrophoresis.
- When adequate separation of bands has occurred, carefully excise the DNA fragment of interest using a wide, clean, sharp scalpel. Minimize the size of the gel slice by removing extra agarose.
- Determine the appropriate volume of the gel slice by weighing it in a clean 1.5 mL microcentrifuge tube. Assuming a density of 1 g/mL, the volume of gel is derived as follows: a gel slice of mass 0.3 g will have a volume of 0.3 mL.
- Add 1 volume Binding Buffer (XP2).
- Incubate at 60°C for 7 minutes or until the gel has completely melted. Vortex or shake the tube every 2-3 minutes.
- Insert a HiBind® DNA Mini Column in a 2 mL Collection Tube.
- Add no more than 700 μL DNA/agarose solution from Step 5 to the HiBind® DNA Mini Column.
- Centrifuge at 10,000 x g for 1 minute at room temperature.
- Discard the filtrate and reuse collection tube.
- Repeat Steps 7-9 until all of the sample has been transferred to the column.
- Add 300 μL Binding Buffer (XP2).
- Centrifuge at maximum speed (≥13,000 x g) for 1 minute at room temperature.
- Discard the filtrate and reuse collection tube.
- Add 700 μL SPW Wash Buffer.
Note: SPW Wash Buffer must be diluted with 100% ethanol prior to use. Please see Page 5 for instructions. - Centrifuge at maximum speed for 1 minute at room temperature.
- Discard the filtrate and reuse collection tube.
- Centrifuge the empty HiBind® DNA Mini Column for 2 minutes at maximum speed to dry the column matrix.
Note: It is important to dry the HiBind® DNA Mini Column matrix before elution. Residual ethanol may interfere with downstream applications. - Transfer the HiBind® DNA Mini Column to a clean 1.5 mL microcentrifuge tube.
- Add 30-50 μL Elution Bu er or deionized water directly to the center of the column membrane.
Note: The efficiency of eluting DNA from the HiBind® DNA Mini Column is dependent on pH. If eluting DNA with deionized water, make sure that the pH is around 8.5. - Let sit at room temperature for 2 minutes.
- Centrifuge at maximum speed for 1 minute.
Note: This represents approximately 70% of bound DNA. An optional second elution will yield any residual DNA, though at a lower concentration. - Store DNA at -20°C.
Medium for E.Coli Culture
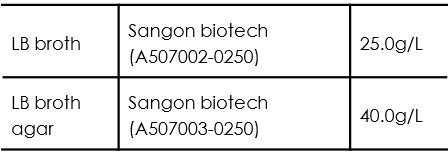
For LB medium using for bacteria inoculation, split the medium into 5ml and transfer the 5ml medium respectively into 15ml tubes before autoclaving.
Autoclave under 121℃ for 30 minutes.
For LB agar medium, after the temperature of the medium cooling down to around 50 ℃, add appropriate volume of antibiotic into the medium. Transfer the medium into 90mm plate afterwards. Approximately 20ml of LB agar medium is applied to each 90mm plate.
As for the antibiotics, we only use ampicillin, and the storage concentration and working concentration are 50 mg/ml and 50 μg/ml.
Restriction Enzyme Digestion
All of the restriction endonuclease we used were from NEB, and a "Typical" restriction digestion can be set as follows:

As for the restriction enzyme, every enzyme should be kept on ice when not in the freezer and the last component added to reaction. Also, we first chose NEB High-Fidelity (HF™) enzymes that provide added flexibility to reaction setup.
As for the NEBuffer, we only used CutSmart buffer as it has the widest applicability to NEB enzymes, thus make the restriction design simpler.
As for the incubation time, we use 4.5 hour in order to digest the DNA template completely.
As for the incubation temperature, the enzyme we used were all good at 37℃.
We make sure that all the components be mixed well using the pipette or flicking.
Ligation
As for the ligation process, we use the T4 ligase from Thermo Scientific (#EL0011) or Exnase from Vazyme (C112-01/02).
Ligation using T4 ligase
All of the ligation process we did using T4 ligase were between sticky ends, the reaction mixture was as following:
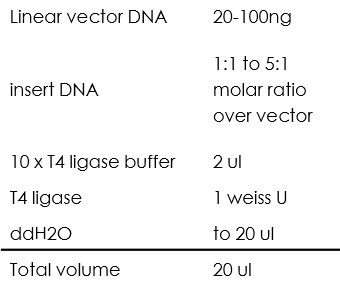
Then incubate 1h at 22℃ (we chose to incubate for 1h instead of 10 min just to make sure that all the fragments were ligated).
Then 5 µl of the ligated products were used for transformation of 50 µl chemically competent cell.
Ligation using Exnase
As the Exnase employs the strategy of homologous recombination, when designing primers for PCR of the insert fragment, we introduced 15 bp homologous sequences into 5’ end of primers, aiming to making the ends of amplified insertions and linearized cloning vector identical to the ends of their neighbours which is required for recombination reaction.
- PCR amplify the insert DNA with specific primers as discussed above.
- Linearized the cloning vectors by restriction digesting with endonuclease.
- Set up the following reaction on ice. Spin briefly to bring the sample to the bottom before reacting:
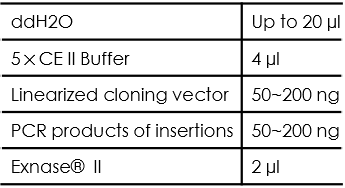
The recommended amount of vector for recombination reaction is 0.03 pmol. The recommended amount of insertion for recombination reaction is 0.06 pmol. Their corresponding mass can be roughly calculated according the following formula:
The mass of vector required = [0.02×number of base pair] ng (0.03 pmol)
The mass of fragment required = [0.04×number of base pair] ng (0.06 pmol)
- After finishing setting up, gently pipette up and down several times with a pipettor to mix thoroughly and try to avoid the formation of bubbles. DO NOT VOTEX. Incubate the reaction at 37°Cfor 30 min and immediately place it on ice for 5 min. Recombination product is now ready for transformation, or otherwise it can be stored at -20°C before transformation.
Transformation of Escherichia coli
Preparing Competent Cell
- Suck up 1μl bacterial liquid DH5α or pick a colony from the plate and leave the bacteria into 5ml LB medium. Culture overnight in shaker. With temperature of 37℃ and rate of 220rpm.
- Transfer 500μl bacterial liquid into an Erlenmeyer flask containing 100ml LB medium. Cult ure until the liquids’ OD600 is between 0.4~0.5.
- Take the bacterial liquid out from the shaker. Put it on ice for 20mins.
- Discard the supernatant. Resuspend the cell with 10ml CaCl2. Put the liquid on ice for 20mins.
- Centrifuge again for 5mins at 8000rpm.
- Discard the supernatant and resuspend the cell with 1700μl CaCl2 and 300μl glycerol.
- Split the competent cell into 100μl. Store under -70℃.
Transformation
- Get the competent cells out from -80℃ refrigerator and put them immediately on ice.
- Add 1μl plasmid or 5μl recombination product into 100μl competent cell. Mix completely and gently.
- Put the mixture on ice for 30mins.
- Heat shock: put the mixture in 42℃ water bath for 90s.
- Get the mixture out from the water bath and put it immediately on ice for 2mins.
- Recovery: add 500μl LB medium, culture for 1~2h in shaker. Of temperature 37℃ and rate 220rpm.
- Spread the bacterial liquid onto the plate of right screening antibiotics. Culture under 37℃ overnight.
Inoculation
- Prepare 15ml test tube, add 5ml LB medium and 5μl Amp (final concentration 50μg/ml) into the tube. The volume of the medium should not exceed 1/3 volume of the tube, or else the bacteria may be deprived of oxygen.
- Pick the selected colony by the tip and leave the tip directly into the tube. Be careful that the selected colony should be white and round, without many satellite colonies around. Make sure that the picked colony is a single colony.
- Shake overnight. With temperature of 37℃ and rate of 220rpm.
Plasmid Extraction
We used Plasmid Mini-prep Kit from Biomiga(PD1213-01).We just post the protocols here with some advice:
- Inoculate 5-12 mL LB containing appropriate antibiotic with a fresh colony. Grow at 37°C for 14-16 hours with vigorous shaking.
- Harvest bacterial culture by centrifugation for 1 minute at 10,000 x g.
- Add 450 μL Buffer A1 and completely resuspend bacterial pellet by vortexing or pipetting (Complete resuspension is critical for optimal yields).
- Add 450 μL Buffer B1, mix gently by inverting 10 times (do not vortex) and incubate at room temperature for 5 minutes. If necessary, continue inverting the tube until the solution becomes slightly clear.
Note: Do not incubate for more than 5 minutes.
Note: Buffer B1 precipitates (cloudy look) below room temperature. Warm up Buffer B1 at 37°C to dissolve precipitation before use. - Add 550 μL Buffer N1, mix completely by inverting/shaking the vial for 5 times and vortex for 2 seconds.
- Transfer the lysate to a 2 mL microtube and centrifuge at 13,000 rpm (14,000- 18,000 g) for 10 minutes at room temperature.
- Carefully transfer 800 μL clear lysate into a DNA column with a collection tube, avoid the precipitations, spin at 13,000 rpm for 10 seconds, discard the flow- through and put the column back to the collection tube.
- Carefully transfer the remaining clear lysate to the column and centrifuge at 13,000 rpm (14,000 - 18,000 g) for 1 minute at room temperature and discard the flow-through in the collection tube. Put the column back to the collection tube.
- Add 500 μL DNA Wash Buffer (Add ethanol to DNA wash buffer before use) into the spin column, centrifuge at 13,000 rpm (14,000 - 18,000 x g) for 1 minute at room temperature. Remove the spin column from the tube and discard the flow-through.
- Optional: Repeat step “9”.
- Reinsert the spin column, with the lid open, into the collection tube and centrifuge for 1 minute at 13,000 rpm.
- Carefully transfer the spin column into a clean 1.5 mL tube and add 100- 150μL sterile ddH2O or Elution Buffer into the column and let it stand for 1 minute. Elute the DNA by centrifugation at 13,000 rpm (14,000-18,000 x g) for 1 minute.
Advice:
- As it takes time to amplify a extracted plasmid of low concentration, the final elution volume could be smaller than required.
Medium for S. cerevisiae Culture
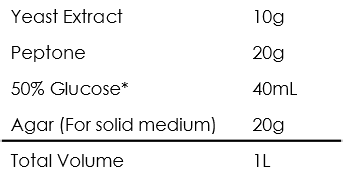
Yeast peptone dextrose (YPD)
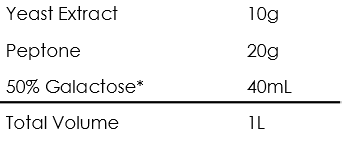
Yeast peptone dextrose (YPGal)
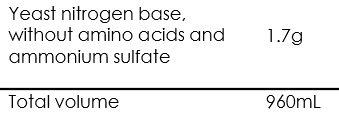
Synthetic dextrose medium without carbon and nitrogen source (SD-N)
Auxotrophic SD medium
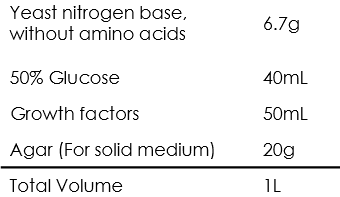
Growth factors
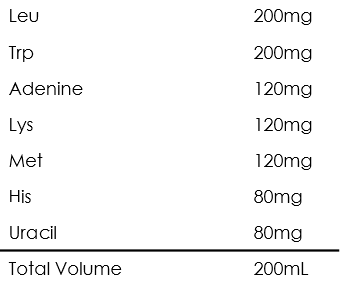
For certain auxotrophic medium, eliminate the corresponding components above.
Note: The final concentration of Cu2+ in induction median for pCUP1 should be 50μM.
Yeast genome extraction
- The identified yeast colonies were picked and inoculated into 8mL of liquid YPD medium, respectively. The medium was shaken at 30° C overnight until the OD600 reaches 0.8-1.0.
- Take 2OD of medium into a centrifuge tube and centrifuge at 5000rpm for 2min, discard the supernatant.
- Resuspend the yeast with 1mL of sterile ddH2O and transfer the mixture into an 1.5mL EP tube. Centrifuge at 5000rpm for 2min and discard the supernatant.
- Resuspend with 200μL of cracking buffer, add 200μL of glass powder and 200μL of phenol- chloroform- dimethylcarbinol (25:24:1) solution, and mix on a vortex generator for 3min.
- Add 100μL of TE and mix.
- Centrifuge at 12000rpm for 5min, transfer the supernatant into a new 1.5 EP tube, add chloroform- dimethylcarbinol(49:1) solution of the equal volume, and mix on a vortex generator.
- Centrifuge at 12000rpm for 5min, transfer the supernatant into a new 1.5 EP tube, add 1mL of ethanol and mix.
- Centrifuge at 13000rpm for 2min, discard the supernatant, add 1mL 70% ethanol to wash the precipitate.
- Centrifuge at 13000rpm for 2min, discard the supernatant, open the lid and place at RT for 30min. Add 100-200μL TE to dissolve the precipitate, and store at -20° C.
Transformation of Saccharomyces cerevisiae
- Incubate 50 ml YPD culture at 30℃ on a shaker at 250 rpm until its equivalent to 1 OD600 (2 x 10⁷ cells/ml). This culture will give sufficient cells for 10 transformations (5 OD per transformation). It is important to allow the cells to complete at least two divisions.
- Harvest the culture in a sterile 50 ml centrifuge tube at 5000 rpm for 4 min.
- Aspirate the medium, resuspend the cells in 5 ml of sterile water, and divide into aliquots.
- Pellet the cells at 4,000 rpm for 1 min and remove water, add:
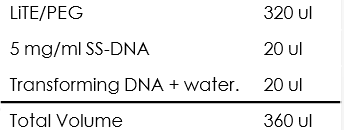
- Mix each tube completely by pipette or vortex.
- Heat shock in a water bath at 42℃ for 45 min.
- Centrifuge at 4,000 rpm for 1 min and remove the transformation mix
- Wash gently with 1.0 ml water, centrifuge at 4,000 rpm for 1 min, aspirate, resuspend in 300 ul water, then spread on the plate.
Fluorescence Microscopy
- Inoculate 5ml of induced medium with fresh cells. Grow to log phase.(OD600=0.8-1.0)
- Add 10μl concanavalin A on a clean slide. Spread it to an area of about 1.5 cm2
- Add 100μl of cells at this area. Incubate for 1min.
- While incubating, set the ZCT software for microscope imaging system. In microscope-manager software, set multi-D acquisition, select channel group and exposure time.
- Add a cover glass on the slide. Press the slide against a stack of blotting paper. Add a drop of champagne to the slide
- Observe the slide and take pictures
Immunocytochemistry of Yeast cells
- noculate 10 mL of YPD media with fresh cells and grow at 30°C to log phase(8-12h)
- Add 1.2mL 37% formaldehyde to fix the cells. Incubate at RT for 30min
- Transfer cells to conical tube and pellet by centrifuging at 3000rpm for 3min
- Aspirate supernatant and wash cells with 1 mL 0.1mol/L potassium phosphate for 2-3 times. Aspirate supernatant and wash cells with 1mL phosphate-sorbitol solution (0.1mol/L potassium phosphate and 1.2mol/L sorbitol. Resuspend cells with 1mL phosphate-sorbitol solution
- Add 5μL β-mercaptoethanol and 15μL of 10mg/mL zymolyase to 0.5mL cells mentioned above, incubate at 30°C for 15-30min
- Pellet cells, aspirate supernatant. Wash with phosphate-sorbitol solution twice. Resuspend the cells with 50-200μL phosphate-sorbitol solution
- Wash slides with 95% ice-cold methanol. Make slides to air dry
- Add 50μL 1mg/mL poly-D-lysine. Incubate for 5 min at RT.
- Wash with ddH2O several times and air dry
- Add 15μL cells to slides. Incubate for 5-10min. Remove the remaining liquid
- Incubate slides with PBS/BSA (1mg/mL, containing 0.5% triton X-100 and 0.05% SDS) for 5min. Wash slides with PBS/BSA(1mg/mL) for 10 tmes. Make slides air dry quickly
- Add 20μL PBS/BSA (1mg/ml) and incubate for 30min(After this step, don’t allow the slides to dry out)
- Remove the excess. Add primary antibody (anti-His mAb). Incubate for 1h
- Aspirate and wash with PBS/BSA for 5 times
- Add secondary antibody (goat anti-mouse IgG). Incubate at dark for 1h
- Aspirate and wash with PBS/BSA for 5 times
- Add DAPI. Incubate for 2min
- Aspirate. Seal slides with mounting medium. Seal edges with nail enamel. Dry for at least 20min.
- Observe under fluorescence microscope
Yeast Luminescence Measurement
- Single positive clones were grown overnight in low fluorescent media containing induction reagents to make a pre-culture.
- From the pre-culture, cells were diluted into fresh media at 0.05OD600 and continued to grow in low florescent galactose media until 1.0 OD600.
- Cells equivalent to 0.3OD600 were spun, supernatant was discarded and cells were re-suspended in 160 μ l of PBS. Cells were transferred to white 96-well flat bottom plates.
- The Luciferase substrate coelenterazine-h (YEASEN) was diluted from the stock according to the manufacturer’s protocol, the working solution should be at a final concentration of 10 uM.
- Make the ligand solution: Glucose was diluted to 1 μ M from 2 M stock using 1x PBS, and the final concentrations were 0, 10, 25, 50, 100, 200mM; Epinephrine was made 1mM stock in 0.1mM HAc and diluted to concentrations 0, 10, 25, 50, 75, 100μM; in mimic patient’s urine sample tests, ligands were dissolved in urine from healthy individuals .
- Synergy2 Multi-Mode Reader (BioTek) was used to measure the luminescence signal.
- 20 μ l each of diluted coelenterazine-h (to a final concentration of 10 μ M) and ligand solution were added to the cell mixture, mixed by shaking and incubated for 2min.
- After incubation, the luminescent signal was integrated for 5min with an interval of 10s.
Yeast Freeze-drying Method
- Cryoprotectant: A 40%(w/v) trehalose solution in ddH2O was prepared and sterilized through filtration.
- A single yeast colony from an agar plate was grown overnight in liquid YPGal medium until it enters lag phase (OD600=1.8-2.0)
- The OD600 of the medium was adjusted to 8 and mixed with 40% trehalose solution at the proportion of 1:1.
- 1mL of the mixture was transferred into an eppendorf tube and was pre-frozen at -20℃ for 30min and -80℃ for 30min
- The mixture was freeze-dried at 0.120mbar (collector temperature -40℃) for 24h using a freeze-drier.
- After the freeze-drying process, yeast were reconstituted into complex medium in the volume initially used (culture + cryoprotectant) during 3h at 30℃.
